My build

  • Some of the links on this forum allow SMF, at no cost to you, to earn a small commission when you click through and make a purchase. Let me know if you have any questions about this.
SMF is reader-supported. When you buy through links on our site, we may earn an affiliate commission.
I know the latch is a bit overkill, But I like it! 
biggrin.gif


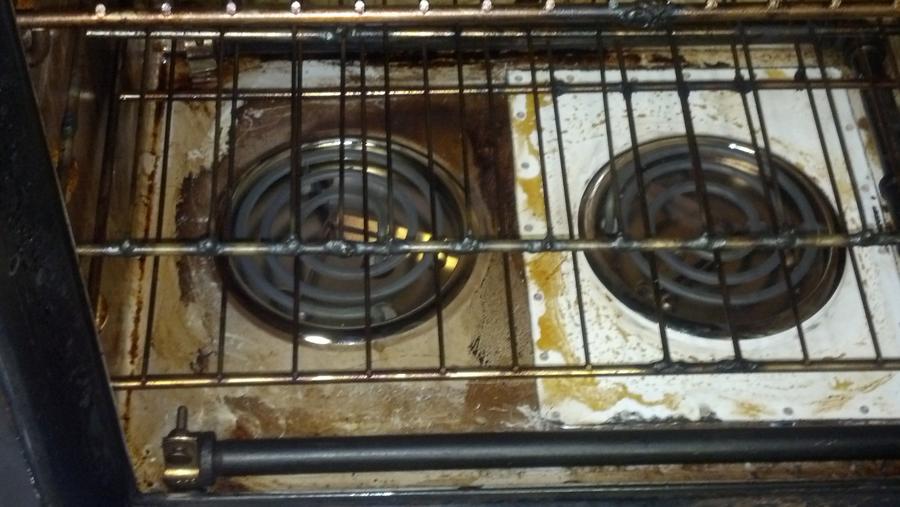
The knobs/switches and hot plates are from a 220v stove that I paid $25.00 for. I wired everything up on my work bench using 110, and it worked perfectly fine so this is what I'm going with...I'm even using the little dummy light to let me know that one, or both, plates are on/off....
The latch will keep the meat from escaping...Lol...Welcome to SMF. Glad you are here with us............
welcome1.gif
 
Thanks guys. Now I just have to wire it up today, and put a fresh air vent in. I have a ball valve laying around, I think it's an 1 3/4"....wonder if that'll be big enough? Would you guys plumb it in from one of the sides, or come in from the bottom with it?
 
Well, it looks like I have to go with the original plan. I had to order the 110v stove elements from sausage maker. The 220v elements just aren't putting as much heat out as I thought. After stumbling across something on the internet that said- If you use a 220v item on a 110v line, you divide the original wattage by 4. That will be the wattage it will now put out. 

After discussing this with my electical engineer in-law, he agreed with the above statement. I originally thought the wattage would just be cut in half. Not true. The combined wattage for the 220 elements was 3,350. I thought I'd get 1,675 watts out of it. Come to find out, I'm only getting a whopping 837.5 watts. No wonder it took so darn long to heat up! 

Oh well, live and learn. Just thought I'd post this so it can help somebody else that might have the same idea. Afterall, failure is how we learn what NOT to do...right? 
hit.gif
 
Last edited:
Now that's a latch  !!!!!     I like your build

Gary
 
Thanks, Gary. My new elements came in. A little disappointed that the hole for one of the elements was too big because of the previous big element I used. I fixed that by cutting one of the small stove element openings from the stove, then pop riveted it in place.

I decided to record some times and temps after the install:
71° outside temp- 69°inside starting temp.
Took 8 minutes to reach 200°
20 minutes to hit 291°
45 minutes to hit 400°

I let it get up to 420° before I backed it down. I'm pretty happy with the 2- 1,000 watt elements. What do you guys think? Did it reach those temps in a decent amount of time?

The last thing I'm going to do is replace the 2" steel pipe that I fill with wood. It just doesn't last long enough- about 2 hours. I have an air supply tank from a tractor trailer that I'm going to cut and weld the 2" pipe to. This will be able to hold much more wood than just the pipe.

 
Please keep us posted on how it turns out and cooks with lots of pictures, I have never had or built an electric smoker, pretty neat. Years ago where we used to deer hunt the foreman running the ranch had taken an old refrigerator put and electric burner with a pan for wood chips to make deer jerky, it was great and seemed to really work well.

Gary
 
Awesome smoker build! Nice wheels on the Nova!!! I like the old school look, I'm building a RF smoker now and will be posting the pictures soon!! Lots of help on this site from Dave and others! one of the best sites I've joined yet for this adventure in Smokin' Meat!

Keep up the good work! Happy Cookin'!
 
I decided to record some times and temps after the install:
71° outside temp- 69°inside starting temp.
Took 8 minutes to reach 200°
20 minutes to hit 291°
45 minutes to hit 400°

I let it get up to 420° before I backed it down. I'm pretty happy with the 2- 1,000 watt elements. What do you guys think? Did it reach those temps in a decent amount of time?


Sounds like it should be fine. Just remember that it'll take a little longer to come up to temp when you have a cold mass (i.e. meat) inside.
 
Thanks again, guys. Smoked a whole chicken in it for dinner tonight. Everything went pretty well, just have to get used to playing with the knobs and fresh air intake, and learn to have patience when adjusting them, lol.

No pics, my phone died while I was out there. Sorry.

RSP, if I had to do it over again, I would have the stack coming through the back, like Dave said. I didn't think about the condensation part when I did it, although no problems today, maybe when it gets colder I might.
 
They are the pipes that the smoke comes into from. I wanted to do it that way to ensure the smoke just doesn't go straight up the stack. It works awesome!

For fresh air intake, I just have an 1 1/4" ball valve.....
 
Glad it's cooking like you expected, Post some pictures.

Gary
 
Sweet Nice Job... looks great, I would live a setup like that.. nice pics and hope it works as good as it looks.. but remember don't judge a book by it's cover... HOWS IT WORK??? to me it looks like it would work WICKED PISSA... that's a New England saying for AWESOME... thanks for the pics and any info.
 
For the air intake I to would go bigger, you can always choke it down, but if you need more air your kinda stuck. The only reason I say that is past experience. We built a RF smoker and without thinking or using  "Feldon's recommendations) we had to go back and redo our air intake because we were not getting enough air flow.

Gary
 
SmokingMeatForums.com is reader supported and as an Amazon Associate, we may earn commissions from qualifying purchases.

Latest posts

Hot Threads

Clicky