My mods: Heat Vs. Smoke

  • Some of the links on this forum allow SMF, at no cost to you, to earn a small commission when you click through and make a purchase. Let me know if you have any questions about this.
SMF is reader-supported. When you buy through links on our site, we may earn an affiliate commission.

ShootIt-SmokeIt-EatIt

Newbie
Original poster
Nov 23, 2017
3
0
I wanted to pass on my mod for controlling Heat and smoke independently. I feel this mod makes the best home smoker you can get.

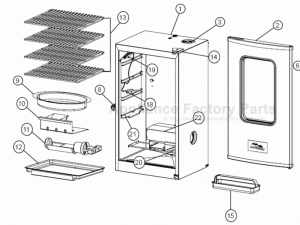
I removed the entire apparatus that lets you slide wood chips in. It is located on the right side of the unit, plus the supporting structure inside the unit.

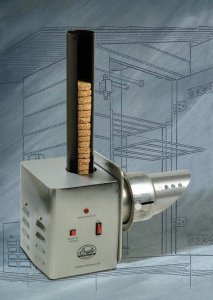
I installed a Bradley Smoke Generator BTSG1 on the left side of the unit. Just cut a whole, slide the mounting sleeve through the hole, done.

I used the insulation from installing the Bradley and aluminum cut from a disposable roasting pan to fill the hole left by removing the wood chip slide. I used pop rivets for that.

This lets me control the heat and smoke independent of each other.

I can do a variety of different kinds of smoking.
I can load up the hopper and walk away for 9 hours.
I can smoke with no heat.
I can smoke low and slow.
I can smoke at high heat.
I can smoke for the first two hours, and opt not to smoke for the rest of the time.
I can alternate kinds of wood such as alternating cherry with apple every 20 minutes.
I can put a brisket in, walk away for 20 hours, come back, open the door and eat it!

The Bradley smoker is way too small.
The big MES is big enough, has great insulation, and has digital temperature controls, but is just not the best at making smoke.

* Helpful Note: Store the Bradley generator on a shelf in your garage. It has issues when the unit itself is below 32 degrees when it is initially turned on. Once it is on, it is fine irregardless of the surrounding temperature. I have smoked to -10 degrees.
 
Last edited:
I wanted to pass on my mod for controlling Heat and smoke independently. I feel this mod truly makes the best home smoker you can get.

I removed the entire apparatus that lets you slide wood chips in. It is located on the right side of the unit, plus the supporting structure inside the unit.

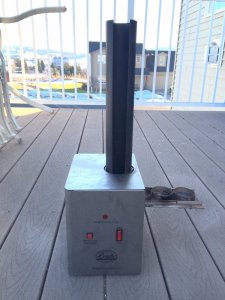
On the left side of the unit at about the same level, I installed a Bradley Smoke Generator BTSG1.

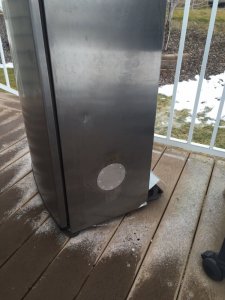
I used the insulation and exterior metal from installing the Bradley unit to fill the hole left by removing the wood chip slide. I used pop rivets for that.

This lets me control the heat and smoke independent of each other.

I can do a variety of different kinds of smoking.
I can load up the hopper and walk away for 9 hours.
I can smoke with no heat.
I can smoke at high heat.
I can smoke for the first two hours, and opt not to smoke for the rest of the time.
It allows me to alternate kinds of wood such as alternating cherry with apple.

The Bradley smoker is too small.
The big MES is big enough, and it has great insulation, and it has digital temperature control, but the temperature vs smoke has always been a problem for me. This is what I did to solve my issue.

* Helpful Note: Store the Bradley generator on a shelf in your garage. It has issues when the unit itself is below 32 degrees when it is initially turned on. Once it is on, it is fine irregardless of the surround temperature.
Do you have any pictures to show how you mounted the unit and where/how you cut the exterior cabinet?
 
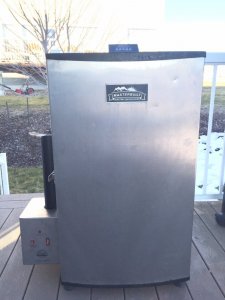
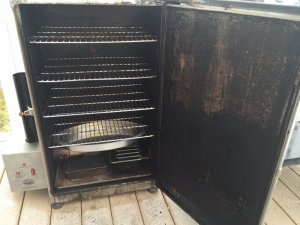
This is what the finished product looks like. Maybe call this a Mesley smoker.

The mods were about $99. In one of the photos you can also see that I made a cover for the drip tray to keep rain water out of it.

The smoker lives under a smoker cover on the deck all year round. It has been there for 6 or 7 years.


IMG_0556.jpg IMG_0558.JPG IMG_0559.JPG IMG_0552.jpg
 
Last edited:
This is what the finished product looks like. Maybe call this a Mesley smoker.

The mods were about $99. In one of the photos you can also see that I made a cover for the drip tray to keep rain water out of it.

The smoker lives under a smoker cover on the deck all year round. It has been there for 6 or 7 years.


View attachment 345308 View attachment 345309 View attachment 345310 View attachment 345307
I like the installation...nice and clean. I'm not familiar with the physical dimensions of the Bradley smoke unit...did you have to do more than use a 3" hole saw to go through the side of your MES? Can you give a little more detail on how you built it?
Thank you.
Don
 
The modification could not be easier.
  • Referring to the diagram, remove 10, 11, 20 and 22
  • The basics of attaching the Bradley are: Drill a whole for the sleeve, slide the sleeve through the whole, slide the retaining collar onto the sleeve, tighten two finger nuts.
  • How I drilled the hole:
    • Since the largest piece to be located on the inside of the MES is the retaining collar, I used the retaining collar to figure out where the hole should be located by moving it around the side of the unit with the MES water pan installed to locate the highest place it could go and centered it back to front.
      • If the hole is too high, the retaining collar will hit the bottom of the installed MES water pan. Please refer to photo earlier in this post.
      • If the hole is too low, the Bradley unit will extend past the bottom of the MES preventing you from attaching the Bradley to the MES. Refer to photo earlier in this post.
      • If the hole is too far forward or back, it will hit the back of the unit or the front door, or it will make it hard to fit the catch pan under it.
    • Once I found where the hole should go you have two choices.
      • Use a hole drill that is the same size as the collar hole.
        OR
      • Drill a small whole in the MES wall that would be in the exact center of the collar's hole, then use the supplied Bradley template to trace the hole to be cut on the outside of the unit and use a jig saw to cut that hole out.
  • Slide the sleeve through the hole
  • Slide the collar onto the sleeve
  • Tighten down the two finger bolts
  • Cut two circles from a disposable heavy duty aluminum pan whose dimensions are one inch bigger than the original chip tray feeder hole. Please refer to photo earlier in this post.
  • Fill the original chip tray feeder hole with the insulation that came from the hole you cut for the Bradley sleeve.
  • Use pop rivets to seal original chip tray feeder hole with the aluminum circles that you made. Please refer to photo earlier in this post.
  • Screwed a 1" L-bracket under the MES heating element to the side of the unit so that the heating element has support. Please refer to photo earlier in this post.

SmokerExplodedCropped.gif BradleyRing.jpg
 
Last edited:
SmokingMeatForums.com is reader supported and as an Amazon Associate, we may earn commissions from qualifying purchases.

Latest posts

Hot Threads

Clicky