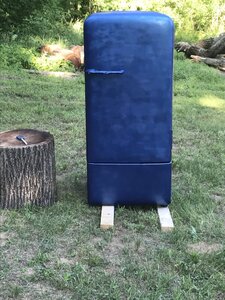
I found this Kelvinator on craigslist for cheap and bought it spur of the moment today. I've always been interested in building a smoker but have never really studied up on it. I am currently slogging through all the great info here and other places on the interwebs and my head is starting to spin haha. I am figuring on using a heating element and my Amazing smoker box to smoke with. Any tips or tricks for the tear down and build up? I currently have a Masterbuilt propane smoker that I have to babysit a little more than Id like, is there a thermostat/heating element I can program to set and forget? Of course the cheaper the better! Thanks guys!


Kelvinator, may be in over my head
- Thread starter burly
- Start date
-
Some of the links on this forum allow SMF, at no cost to you, to earn a small commission when you click through and make a purchase. Let me know if you have any questions about this.
You are using an out of date browser. It may not display this or other websites correctly.
You should upgrade or use an alternative browser.
You should upgrade or use an alternative browser.
SMF is reader-supported. When you buy through links on our site, we may earn an affiliate commission.
Several guys love the auburn pid have no experience with this. I use a ranco etc 1100 electronic thermostat I believe with a contactor to cycle my hot plates since I got my ampts I haven’t used the pans on the hot plate in a year or so. On a side note my dad has that exact fridge in the garage a neighbor gave him sounds like he’ll but still cools. Good luck
hank2000
Smoking Fanatic
I have a MES 40 that the controller went out on. I replaced it with a Auburn PID. It works great. Temps or +/- 1degree. It cost about $150. A little spendy but worth it as far as I’m concerned I don’t believe you will go wrong with it
It this as easy as it looks, or am I missing something? I am not an electrician by any means.
If I get this Brickman heating element....
and plug it into the back outlet of the Auber....
http://www.auberins.com/index.php?main_page=product_info&cPath=14_28&products_id=381
which in turn is plugged into an outlet in my garage it's good to go?
If I get this Brickman heating element....
and plug it into the back outlet of the Auber....
http://www.auberins.com/index.php?main_page=product_info&cPath=14_28&products_id=381
which in turn is plugged into an outlet in my garage it's good to go?
Is the inside of the door plastic or something similar ?? Probably is... you will need to change it... Use something like 20 gauge cold rolled steel... Do not use aluminum..
In order to get the door skin to fit AND have the door close properly, you will need to set the door in the proper plane when securing the door skin....
Remove the door, place it on the floor... shim the 4 corners with wedges until it is perfectly level in all directions...
To check for it being in plane, using sheet metal screws, put 1 in each corner.. tightly draw string between the corner screws forming an X in the center of the door... Tweak the shims, on the corners, until the strings just touch in the center X... NOW the door is in plane and it will fit a perfect seal.... Believe me when I say this.. It took me some time to figure out how to get the door to fit perfectly, to the fridge bodies...
place the new skin on the door and secure it with sheet metal screws or pop rivets.. I personally like rivets.. trim the skin... I use an angle grinder with a thin cut off blade... re-attach the door... measure the gap... then secure what ever it takes to fill the gap.. wood strips will work... glue using 3M 5200 and a few screws.. Then attack gasket material for the "Air Tight" part of the seal... Test fit the wood strips with the gasket material to insure the door will latch in it's ORIGINAL position... very important...
hank2000
Smoking Fanatic
Yes it is that easy.It this as easy as it looks, or am I missing something? I am not an electrician by any means.
If I get this Brickman heating element....
and plug it into the back outlet of the Auber....
http://www.auberins.com/index.php?main_page=product_info&cPath=14_28&products_id=381
which in turn is plugged into an outlet in my garage it's good to go?
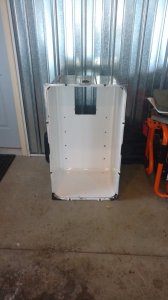
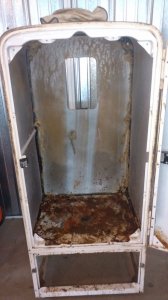
Well, I got the easy parts done. Its all stripped down. I threw all the insulation out, it smelled a little musty. Im planning on pressure washing it all and go from there. Inside the cabinet between the tub and the cabinet is some black caulk, almost seems like tar and is very hard to scrape. You gents think it will be alright to leave? Im planning on insulating it well and the caulk wont have direct heat on it. Thanks for the tips so far, keep them coming. Ill post when I do some more...whenever that will be.


Attachments
bena
Meat Mopper
dano62
Newbie
- Jan 13, 2017
- 10
- 10
It this as easy as it looks, or am I missing something? I am not an electrician by any means.
If I get this Brickman heating element....
and plug it into the back outlet of the Auber....
http://www.auberins.com/index.php?main_page=product_info&cPath=14_28&products_id=381
which in turn is plugged into an outlet in my garage it's good to go?
Is this what you did? I’m starting my own fridge build and trying to figure out what kind of heat source I want to use.
I would use 3 each 1" air inlets... each side and one in the back... about 3" above the floor... For the exhaust, I would use 1 each 2" exhaust... Run the exhaust out the back side of the body and extend it in so it draws from the center of the meat area..... That should provide for a even exhaust flow for all areas of the smoking chamber... Running it out the back will eliminate condensate dripping of the meat.... Been there, done that......
The smoking chamber will act as a chimney... as long as it's a few degrees above ambient... Remember that when you start to cold smoke stuff....
The smoking chamber will act as a chimney... as long as it's a few degrees above ambient... Remember that when you start to cold smoke stuff....
Well, finally got her about finished. I'm going to smoke some pork steaks today and see how it goes. I got it up to 300 yesterday for about 5 hours to test out the Auber and play with it on my phone. Took about a half hour to get to 225, and held the heat pretty well. Only warmth I could feel was around the door.
Attachments
That exhaust stack will collect condensate and it will run back in to the smoker...
How does the door seal ?? Did you get it to fit flat to the body ???
How does the door seal ?? Did you get it to fit flat to the body ???
- Feb 5, 2019
- 64
- 44
That exhaust stack will collect condensate and it will run back in to the smoker...
How is he supposed to prevent that?
Well done, you will love it. I have a 90 deg bend on mine, but only a short vertical run, maybe 3 in above top of fridge. I have had no problems with condensation but maybe a taller run would condensate. I use a river country 115V element and it works fine. Dave is right about the fresh air pipe. I have four 1inch pipes in the bottom and a 2inch exhaust and that is a decent draw. The door is a pain in the ass to get into plane. Mine was not perfect but I used a very thick firerope and it works pretty good, with a small leak at one corner, but I call that auxilliary draw.
Good luck with it, should last a long, long time.
Good luck with it, should last a long, long time.
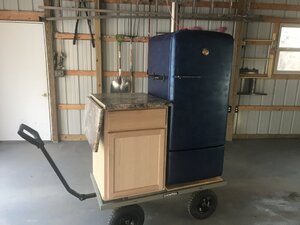
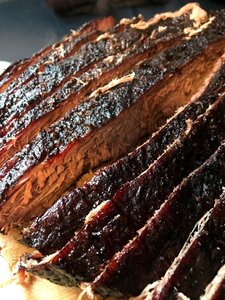
Sorry for the lack of timely responses. I've made about a dozen smokes so far including two briskets and everything seems to be working just fine. The door seal in lava lock wool felt doubled up on the door and around the fridge. I feel some heat escape out of it and none on top of the smoker or the sides. A little smoke occasionally finds its way out around the bolts I used to plug the emblem holes and around the belt plate I attached to the door in its place.
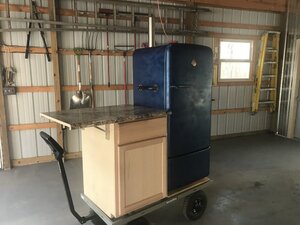
The dang thing got heavy on me though so I bought a cart to move it around easier and added a cabinet and little counter top to the wagon. All in all I couldn't be happier with the whole unit. I was somewhat limited with what I wanted to do at times with my old smoker and this new one has got me fired up to cook more and different things. Thanks for all the help on here and in the smoking sections. I am a member or lurker on a handful of different forums of different interests and this is by far one of the friendlier sites.
Top to bottom:
The General Sherman on the Smoke Wagon
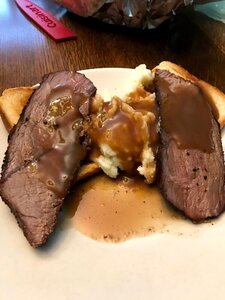
Smoked open face roast beef
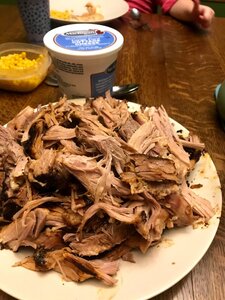
Pulled Pork
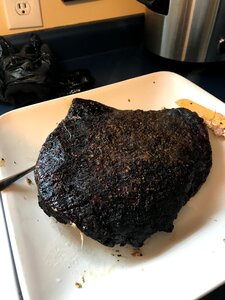
Brisket and sliced brisket
Cornish Hens, are a few of the things I have made.

SmokingMeatForums.com is reader supported and as an Amazon Associate, we may earn commissions from qualifying purchases.
Similar threads
- Replies
- 3
- Views
- 675
- Replies
- 1
- Views
- 2K
- Replies
- 5
- Views
- 1K
- Replies
- 3
- Views
- 789
Hot Threads
-
Featured My 2nd ( really first ) Porkstrami , and I must say Glad I did it twice, Only took a little over a month to do.
- Started by DRKsmoking
- Replies: 35
- Pork
-
Man cave!
- Started by Steve H
- Replies: 32
- Blowing Smoke Around the Smoker.
-
Help with a smoked turkey breast?
- Started by DieselTech
- Replies: 30
- Poultry
-
Survey for Daughter's Math Class
- Started by Kvgsqtii
- Replies: 28
- Blowing Smoke Around the Smoker.
-
Pellet Grill Professionals. Couple Questions?
- Started by DieselTech
- Replies: 27
- Pellet Smokers


