Some of the links on this forum allow SMF, at no cost to you, to earn a small commission when you click through and make a purchase. Let me know if you have any questions about this.
Found this thread accidently. Great to see there are others that have discovered this sweet grill/smoker. I've peeked at all the mods and hats off to all for their ideas. I've had my CG Smoking Pro w/sfb since 2005 so have either tried or done many of the mods I've seen here. Theres more than one way to skin a cat. But I've also done many more mods to my unit.
1. Insulated lid mod.
2. MC (Main Chamber) lid hinge mod.
3. Heavy Duty Frame and Wheel mod.
4. Side Burner shelf mod.
5. SFB cooking shelf mod.
6. Tire valve temperture probe mod.
7. Lid gasket mod.
8. SFB charcoal grate Mod. (Raise shelf.
9. AfterBurner propane conversion mod.
10. EZQue Basket rotossiere mod.
12. Both home made charcoal basket mod & Store bought Charcoal basket mod.
I archived with photos most of what I did. If anyone is interested I'm sure I can find them with a little digging and would be happy to pass on what I've learned in the mod department. After all that's how we learn! :icon_smile:
Great ideas on here. I have put a few in place and have had better success on the last few smokes. Anyone have a recommendation on where to put the AMNPS? I have tried on the Right side of the grill (worked well for about 4 hours, then the pellets combusted and sent the temps soaring), I have tried the Left side (can't seem to keep it smoking), and I have tried in the firebox on the right side with the coals pushed to the left side (as you can imagine, its way too hot in there and it caught fire pretty quickly). Any help/ideas are appreciated. Thanks
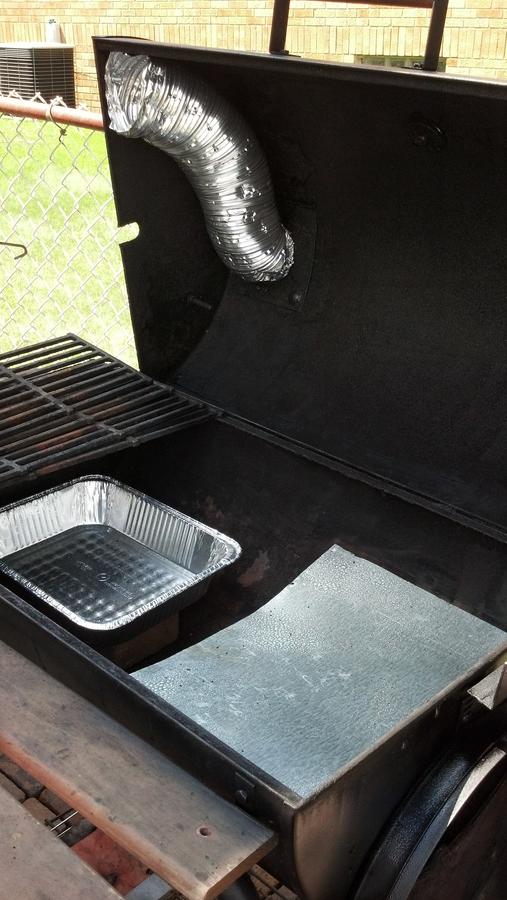
Thanks for all of the tips guys. I was going to start shopping for something new when my ash pan rusted through, but I have re-invented my Char-Griller. I added the side fire box, dryer vent to lower the smokestack to grill level,
made rails inside with angled steel to hold my 2 cake pans inside that act as a baffle for the firebox as well as a tuner that I can slide where I need, and act as water pans as well.
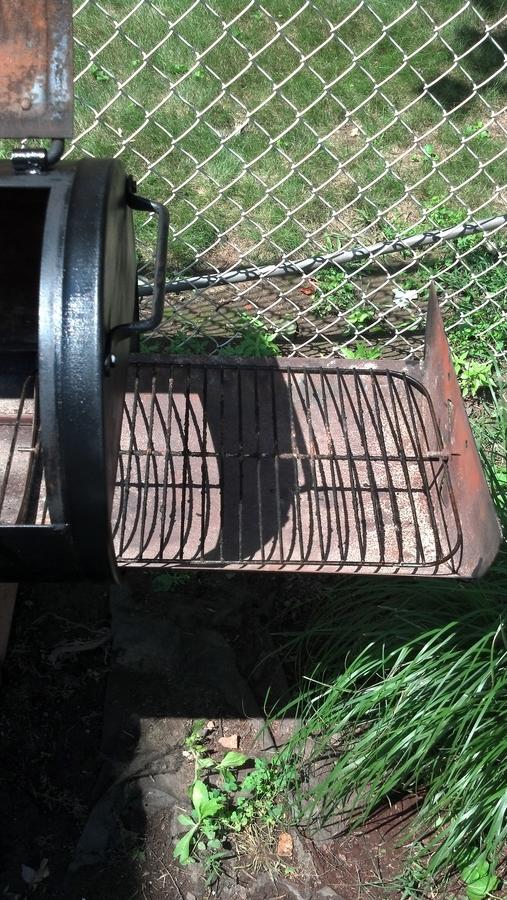
Also lined the bottom with lava rock to retain heat and added some lava rock. I used expanded metal to create the charcoal box and used the ceramic grills that came with the side fire box bolted together to rest it on.
I would not use any type of paint on the inside of any part of your smoker. I would be fearful of fumes from the paint getting into your food. On my smokers I bought a cheap spray bottle at WalMart. I filled the bottle with vegetable oil. I bring the temp up on the smoker with it empty in the cook chamber a do multiple coats as if I where seasoning my cast iron cooking pans. The more the smoker gets used the more natural protective coating comes natural while smoking.
I've posted this on other threads, but this is my "poor man's" baffle using two of the charcoal grates and multiple wraps of HD foil. It is suspended from the cooking grate by two loops of bonsai wire. The bottom of the baffle grate and the next grate have holes scattered across them by a 1/2" drill bit used as a punch. Temps are within 5-7 degrees side to side:
Being a newbie to this website, I am going to definitely do some of these mods. I have been using mine for about three years now w/o any mods. Of course the food was great but it can be much better. Thank you all for the great ideas and tips!!!!
Looks great. I am looking for some simple ways to do some mods since I am not a welder or anything. I like the cake pan idea. I was also going to buy a piece of aluminum sheet to make a baffle.I am sure I could manage to cut that!. I also wanted to ask you how did you attach the dryer vent to the grill lid?
I just did these mods this morning. Uses dryer vent, H2O pan is from dollar store. I used an old grill grate from a small picnic grill for my fire box. I bought a sheet of aluminum for the baffle. I had to order two thermometers so waiting for them to come. Think I am going to test it out with a nice brisket today!!!!
IMHO you do not need a water pan in the CharGriller IMHO, I find it does nothing and you end up using more fuel heating the water. Keep it in as a drip pan for the meat juices, it'll make cleanup easier.
Looks great. I am looking for some simple ways to do some mods since I am not a welder or anything. I like the cake pan idea. I was also going to buy a piece of aluminum sheet to make a baffle.I am sure I could manage to cut that!. I also wanted to ask you how did you attach the dryer vent to the grill lid?
I attached my flexible dryer vent to the bottom of the smoke stack with a ring clamp. And then I simply used a large hair pin (bobby pin) to clip the other end on the edge of the lid.
IMHO you do not need a water pan in the CharGriller IMHO, I find it does nothing and you end up using more fuel heating the water. Keep it in as a drip pan for the meat juices, it'll make cleanup easier.
I have been using the water pan on the right strictly as a baffle, and drip pan, no water in it. My temps were running slightly higher on the far side so I put water in there and it has been running even ever since.
I picked up a 3'' drier hose but my stack on the char-griller under the lid is flared. I can't get the hose on. How are guys getting the 3'' hose on assuming everyone else's is flared as well?
If you can find a 3" coupling, it will insert into the aluminum flex hose and the exhaust on your smoker...... Maybe...... Don't forget hose clamps... or you can try a can from canned goods that fits... measure some cans at the market... you may have to get a can that is too big in diameter, split down one side... compress... clamp and insert..... Dave
I picked up a 3'' drier hose but my stack on the char-griller under the lid is flared. I can't get the hose on. How are guys getting the 3'' hose on assuming everyone else's is flared as well?
I used a pair of channel lock pliers and an appropriate amount of profanity to bend the flange down far enough to fit the dryer hose over it. Then I used some tie wire to make good and sure it was adequately secured to the stack. It's worked just fine so far.
If you use a hose clamp, beware of galvanization. Most of those are galvanized or nickel plated, I believe. Either way, I wouldn't use it. That's why I opted for tie wire instead.