Another Fridge build

  • Some of the links on this forum allow SMF, at no cost to you, to earn a small commission when you click through and make a purchase. Let me know if you have any questions about this.
SMF is reader-supported. When you buy through links on our site, we may earn an affiliate commission.

KCinNE

Newbie
Original poster
Feb 14, 2024
20
20
NW Nebraska
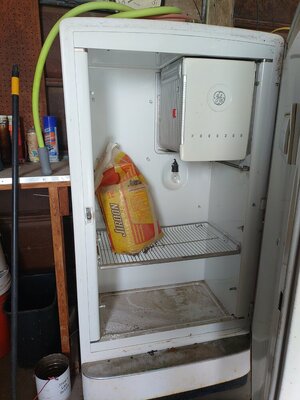
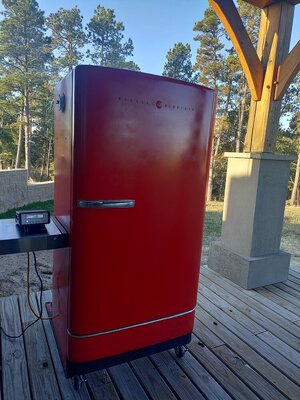
I'm getting ready to start a smoker build using a 1953 GE fridge. Trying to think through everything and starting to make a materials lists. Question for today is in regards to the exhaust/vent. What is the recommendation of the group... High in the back, high on the sides, or on top? Or a combination of those ? Suggestions on size or sizes ?

The smoker will be electric using an AMPS most likely. Thanks in advance.
 
  • Like
Reactions: JLeonard
I would put 2 vents on each side. Size them according to the intake vent. I would make the exhaust vent equal too or larger than the volume of you intake air vent to assure good air flow. The reason for vents on both side would be to compensate for wind direction. Generally I leave my vents wide open during a smoke session to avoid a creosote buildup especially doing cold smoking. I used a PID and a 1800 watt element in my smoker to control the heat and the "mailbox" modification for the smoke tubes using pellets. Just my 2 cents of how I did mine.
60081441711__3C34EE42-A00B-435A-9EF3-71A5D98943A1.JPG
IMG_0389.jpg
 
  • Like
Reactions: jaxgatorz
I would put 2 vents on each side. Size them according to the intake vent. I would make the exhaust vent equal too or larger than the volume of you intake air vent to assure good air flow. The reason for vents on both side would be to compensate for wind direction. Generally I leave my vents wide open during a smoke session to avoid a creosote buildup especially doing cold smoking. I used a PID and a 1800 watt element in my smoker to control the heat and the "mailbox" modification for the smoke tubes using pellets. Just my 2 cents of how I did mine.View attachment 689166 View attachment 689167
Thanks for the feedback. I could not see your vents/exhaust in your pictures, maybe I overlooked them ?
 
I agree... vents on sides or back... DO NOT put on top as the condensation builds up inside the vent and then starts dripping back down on the food ...
 
I think I will put a 3" intake in the bottom of the tub, under the heating element, and then 4" exhaust on each side up high.

I've looked at some of the "production" built, higher end electric smokers and it seems like they all have top exhaust. I'm wondering why that would be if condensation builds and drips down on the food? I'm probably missing something.

I'm thinking of putting a 4" exhaust in the top as well with a drip pan underneath based on your feedback.
 
This weekend I started on my fridge smoker build. I got it all tore apart, made all the mods to the cabinet and tub, built in/out air ports, rough wired it, modified an ammo box for smoke generation and made a simple cart for it. I'm ready to start putting it back together but I've got a basic question. How does everyone adhere the insulation to the cabinet? I'm thinking of using high temp silicone/adhesive (food safe)? I tried not using anything but the insulation for the top/roof keeps falling. Then I thought about laying it on its back and putting it back together. But wondered if it would still fall once, I put it back upright. I was planning on having an air gap between tub and insulation but maybe that is a bad idea.

I hope to get back at it this weekend and I'm sure I'll have more questions so thanks in advance.
 
Well it took about 4 days in total but, my fridge smoker build is all done except for the paint. I was curious if anyone who has done one of these builds ever put any safety features on them. Something to shut the unit down if there is a fire or extreme heat inside the cabinet ? Or anything else ?
 
Sorry late to the party....No real advice to give. But would love to see the build. And giving a bump so others can see.

Jim
 
Thanks Jim. Well I don't seem to have gotten much response from this forum so I'll just press on. Here are some a few before pics.
Before 1.JPG
Before 2.JPG
Before 4.JPG

Before 3.JPG
 

Attachments

  • Before 3.JPG
    Before 3.JPG
    133 KB · Views: 10
Very nice build.
I wasn't keeping up on this thread since you first posted in February.
Appear you used the existing fiberglass batt. Generally the way to secure is to use batt anchors. I'm not sure what they are really called. A spike anchor that you impale the batt and a washer over the batt onto the spike to hold it.

Use a remote thermometer with a high temperature alarm.
I have a ThermoWorks unit with a phone app.

How are you planning to control the temp?
You could have added high temperature thermal fuses in the build. They art in the electric circuit to disable the heater element in event of an over temp situation.
 
No, I replaced all the fiberglass insulation with rockwool. I am using a WiFi enabled PID to control the temp. I guess I can always add a probe to cut power to the heating element In the future if need be. Thanks
 
  • Like
Reactions: JLeonard
I have an old Westinghouse fridge for a build.
I removed the compressor, condenser and evaporator coils before taking it home to sit in the garage for oh 3 years now.
I hope to gut the interior and contemplate the remodel this summer. I am planning to put the smoke box in the bottom where the compressor used to reside.
 
Go for it !! Its really pretty straight forward. Tear it apart, put some holes in it, and put it back together. A couple of weekends and you'll have it done.
 
Sorry you didnt get much response on the first go around. Some times a lot of post hit and it gets shuffled down the list.

Looks like a great build and a heck of a way to repurpose a old fridge. Looking forward to seeing it put to work.

Jim
 
Thanks Jim. No worries, it was pretty straightforward so my questions probably weren't necessary. It is snowing here today but hopefully by mid-week I can get it painted. Then she'll be ready for her maiden voyage.
 
  • Like
Reactions: JLeonard
I still have a touch left to paint but decided to fire it up anyway. Kept it simple, just 10 lbs of snack sticks. Started at 100, then 120, then 140, then 160, and then 170 until IT was 158. Took a little over 9 hrs total, smoke tube was good for about 6 hrs. They cooked faster than expected because I think the fridge does a way better job of holding heat. I did a taste test and I'm pretty happy with the results. I love the WiFi PID !!! I was able to get about of mile of fence run while my snack sticks were smoking, the whole time I was able to monitor things on my phone. I can't beat the simplicity of it all. Here are a few pictures.
 

Attachments

  • First Smoke 2.JPG
    First Smoke 2.JPG
    78.4 KB · Views: 6
  • First Smoke 4.JPG
    First Smoke 4.JPG
    133.6 KB · Views: 6
  • First Smoke 5.JPG
    First Smoke 5.JPG
    145.3 KB · Views: 6
  • First Smoke 6.JPG
    First Smoke 6.JPG
    193.2 KB · Views: 6
  • First Smoke 7.JPG
    First Smoke 7.JPG
    181.9 KB · Views: 6
  • Like
Reactions: 02ebz06
SmokingMeatForums.com is reader supported and as an Amazon Associate, we may earn commissions from qualifying purchases.

Hot Threads

Clicky