Added pic My first reverse flow smoker build

  • Some of the links on this forum allow SMF, at no cost to you, to earn a small commission when you click through and make a purchase. Let me know if you have any questions about this.
SMF is reader-supported. When you buy through links on our site, we may earn an affiliate commission.
Patiently awaiting... Hopefully you ordered calibratable gauges ... meaning adjustable...
Well crap I didn’t look for or think about that feature. I got these. Just looked it up doesn’t appear to be 🤦‍♂️ I am about to go into work and can’t take phone in. No cancel order button and I gotta call and they are not open currently. Ugh…

Tel-Tru BQ300 3" Glow Dial Barbecue Thermometer​

 
Last edited:
OK... Welp... Just do the calibration test with boiling water before installing... Once installed use your probed thermometer (boiling water calibrated as well) on the grate where you will be cooking and then compare the Tel Tru with the probed one...
 
OK... Welp... Just do the calibration test with boiling water before installing... Once installed use your probed thermometer (boiling water calibrated as well) on the grate where you will be cooking and then compare the Tel Tru with the probed one...
Pretty much what I will do if they create me issues I guess I will replace down the road but . Thanks for pointing that out I will make sure any future ones are that way for sure.
 
  • Like
Reactions: JLeonard
The CC door with be the death of me. lol I tried to fix up the door welds I did when I was really green at welding. Still no professional. I was like I can make it better looking lol. I got out the 4x4’s and ratchet straps secured the door and tried to weld small place at a time let cool and move to another section weld rinse repeat. Well yeah it warped on me again. So back to straightening that back out and I am not touching it again. 🤣🤣🤣🤣 The rain doesn’t want to stop either by the way the PA forecast looks so idk when I will be doing the test burn. lol oh well gives me time to work on some of the small stuff and fix the door again. 🤣🤣🤣 it’s all good tho cause it’s teaching me things and making me figure out stuff incase I run into this stuff ever again. No pics sorry guys but stay tuned I will have more soon.
 
  • Like
Reactions: FritzHlzr
Ok question time again. I know lol. So when I do a test burn. Do I need to install all the seals on the doors? I know a test burn is to see how things are working. Idk if that matters or not. Reason I ask is if you have been following the CC door has been a pita from the start. It’s actually buckled in a little from the tanks straps. I should have chosen a better side of the tank for the door but some part of the buckled metal would have been on the door. Plus it’s patched a few places which I know the welding on it didn’t help it by any means. I put it where it is Incase it needs patches or repairs down the road and it’s easy to get to. Instead of being at the bottom of the cooker. I worked on it the last 2 days and it’s not gonna get any better with the latches and a 1/8” gasket it will be actually really good except one corner that I just can’t get perfect. I will just add a second piece of 1/8” gasket and it will be sealed up. I think they need added to check efficiency. Maybe I already know and answered my question but I want to ask before I make another first time build oversight lol.
Thanks
 
Myself... I didn't worry about the CC door leaking... My worry was the FB door ... That, I wanted sealed good so the intake vents would have full control of the fire (no air leaks) ...

Fire it up first before sealing CC door and see how bad it's leaking... Just remember to clean the area good where you will put the seal so it sticks well... I used a high temp sealant to put the seal on the FB door... Just remember if you put a seal along the top of the CC door (hinged side) it may make the door stick out further away at the bottom of the door (know what I mean?) as the hinges were welded on with the door tight against the chamber...
Awesome thanks. Yes I got u on the top side of the CC door for the bottoms sticking out. I will just lay a piece on the top to see what it does to the bottom side. I will probably test fire it tonight since I dont have to worry about the CC seals. The FB door I can just pinch the seal in place to test it. It’s gonna be the best day today for the next like week to put the smoker outside to test it. Thanks for the help much appreciated. I will post update and pics later.
 
Awesome thanks. Yes I got u on the top side of the CC door for the bottoms sticking out. I will just lay a piece on the top to see what it does to the bottom side. I will probably test fire it tonight since I dont have to worry about the CC seals. The FB door I can just pinch the seal in place to test it. I have the higher temp sealant also. It’s gonna be the best day today for the next like week to put the smoker outside to test it. Thanks for the help much appreciated. I will post update and pics later.
 
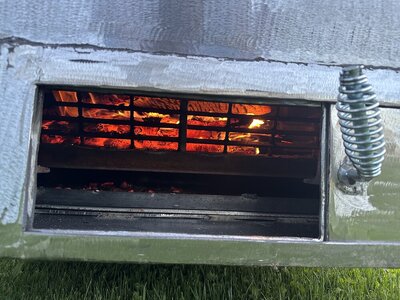
Well huge success I think. Test fire tonight. Took it up to 410 degrees wide open to see if it would go that high. It hit that temp right about 1hr of putting fire in the box. Tires don’t get even 1 touch of hot. I been checking them it’s been burning 1&1/2hrs at this point. I will still put fenders on them anyways just incase. It seems to flow very well I closed the top air intake and it drop 10 degrees like now. Let me know what u guys think.
 

Attachments

  • IMG_4277.jpeg
    IMG_4277.jpeg
    324.8 KB · Views: 23
  • IMG_4278.jpeg
    IMG_4278.jpeg
    207.1 KB · Views: 23
  • IMG_4279.jpeg
    IMG_4279.jpeg
    320 KB · Views: 21
  • IMG_4284.jpeg
    IMG_4284.jpeg
    319.9 KB · Views: 22
  • IMG_4285.jpeg
    IMG_4285.jpeg
    181.8 KB · Views: 21
  • IMG_4286.jpeg
    IMG_4286.jpeg
    169.7 KB · Views: 23
I had it burning for 2&1/2hrs. Had it down to 265 degrees so I believe when I actually have it fully sealed up and burning correctly not trying to get it hot the 225-250 isn’t going to be hard to attain or hold. I had to cut it short and couldn’t mess with it a lot. I had to get it cooled down to put it back in the shed cause of the rain for next 4 days coming. I don’t need it all rusted. In the mean time it only used 6 or 7 pieces of slab wood that I by from the lumber yard that does rough cut lumber they are thing slices that they could use any more to make lumber for anyone that might not know. Which I am really happy with. Cause that means it will not a ton of wood in a cook. I would have used that easily for that in my cheap big box offset I have been using for years. It does need a bit more front counter weight tho. Idk if I will mess with that or not idk but I figured out a way to add about 200 lbs to it using the left over 8” pipe and concrete. It also was everything me and my 2 kids daughter 16 and boy 12 to get the smoker back into the shed. 🤣🤣🤣🤣
 
That is beautiful. And its great to see all that hard work come to fruition. Sounds very fuel efficient also.

Jim
Thanks. I thought it would take a ton of wood to get it going and stuff. if it keeps burning like that it will be way more efficient than I expected. I can’t wait for the first burn of several hours to see for sure and the food that will come off of it.
 
Impressive build
Planning for the next one, yet?
...
It does need a bit more front counter weight tho. Idk if I will mess with that or not idk but I figured out a way to add about 200 lbs to it using the left over 8” pipe and concrete. It also was everything me and my 2 kids daughter 16 and boy 12 to get the smoker back into the shed. 🤣🤣🤣🤣
You need one of those power units to move an obscenely heavy professional mechanics tool box.
 
  • Like
Reactions: irvin78787884
Impressive build
Planning for the next one, yet?

You need one of those power units to move an obscenely heavy professional mechanics tool box.
thank you much appreciate. I actually at some point want to build a wooden smoke house just a small one. I am toying with that idea. Plus I have 2 smaller air compressor tanks that I am thinking I might build and throw them up for sale. Just not sure how soon I want to jump right into another build. As I want to enjoy this one some first lol. I will certainly need something to move it around. I am thinking of make another pull bar with a trailer hitch setup so I could put the 2” ball in my sxs to pull it around.
 
SmokingMeatForums.com is reader supported and as an Amazon Associate, we may earn commissions from qualifying purchases.
Clicky