Greetings / Compressor Tank Build

  • Some of the links on this forum allow SMF, at no cost to you, to earn a small commission when you click through and make a purchase. Let me know if you have any questions about this.
SMF is reader-supported. When you buy through links on our site, we may earn an affiliate commission.
More progress today.  Doesn't feel like a whole lot for the hours I put in....but that might just be the nasty heat and humidity trying to work outside...

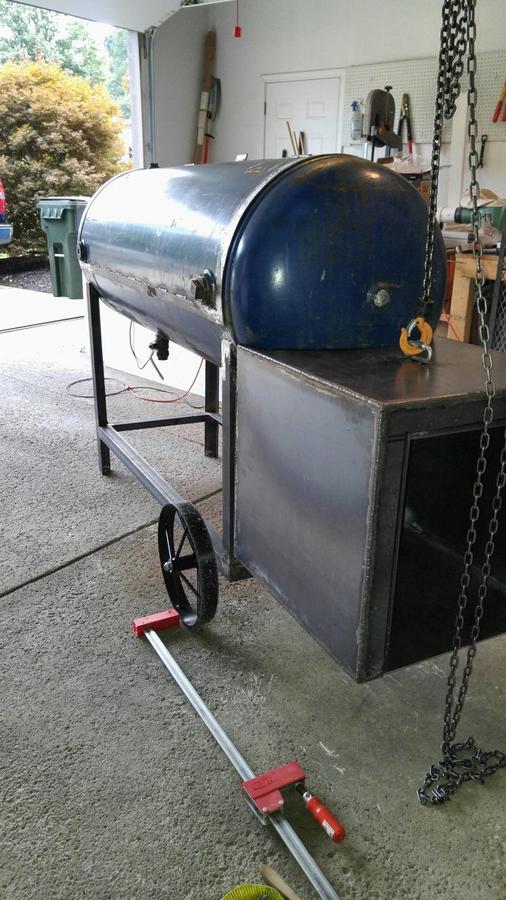
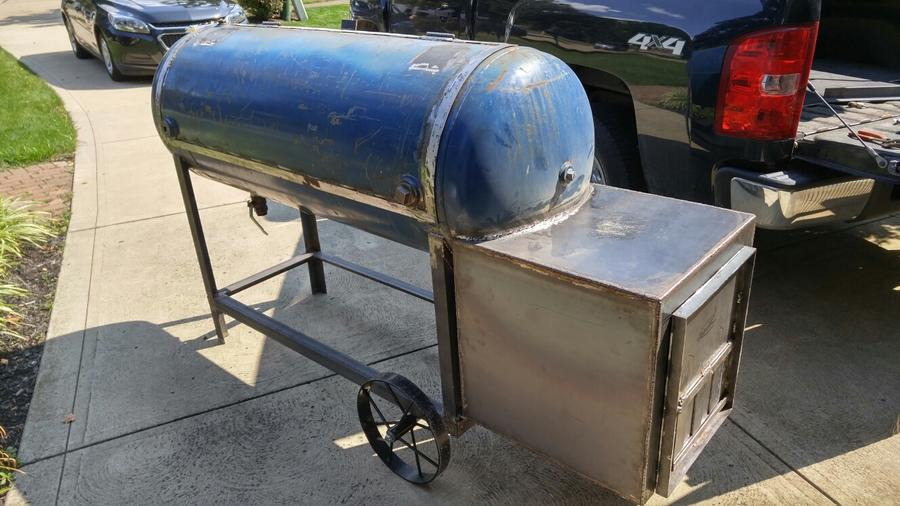
Cleaned up and basically re-welded all of the tank-to-leg joints.

Front legs cut and welded on.  They're about 3/4" lower than the wheels, meaning the whole tank is slightly leaning towards the front for drainage.

Also got the top and bottom cooking grate frames done:


Lastly...had just enough time left to cut out the expanded metal and get it welded to the bottom cooking grate:


Next I'll get the grates all finished up and then it's on to mounting the door.

Kevin
 
Very nice work brnhornt. The grates came out looking fantastic. And those doors can test your patience. I look forward to seeing some more updates. :)
 
Absolutely beautiful day here in Ohio today...really enjoyed working outside and making progress.  Picked up my plate yesterday and got most of the pieces for the fire box cut out last night (I should buy stock in cutoff wheels ;) )  That meant this morning it was straight to assembly and fun.

Corner to corner welds everywhere...quick shot of the burn thru after a root pass:


Not the prettiest in the world, but they're the best I've done so far and no doubt they'll hold her together:


Quick shot of the door opening with some 1/8 flat on the inside as door seals:


Thanks for following along!
 
Heck yeah!!! :) You are getting the hang of that stick now brother. :) Your firebox looks great. 
Looks-Great.gif
 
Thanks kam :)

Made one annoying mistake...I got the box's orientation all turned around and was just crusing along with the welding that I welded the top joint of the rear plate of the box.  That's where it meets up with the CC and I am going to be cutting the opening.  So rather than just cutting one curved line...I'll now have to cut open the weld...LOL...more practice with the grinder and cut off wheel...
 
When I set up my firebox I mark don't weld next to the FB/CC seam. Sometimes it's necessary to remind yourself. Cut that seam now as it's much easier to cut now than when it's up against the tank.

Kyle
 
Made some more progress.  Go the firebox vent and damper done and welded up.  Straight up rip off of kam's.  Just need to decide on my door latch method and then she's ready to get mounted to the firebox.

Hate my welds on this...I can't really say what happened...didn't feel rushed...wasn't tired...just came out pretty clumpy.  I know they'll hold...but I'm kicking around the idea of grinding them down and doing them over:

 
Your door looks great buddy. :) On the welds get your grinder on edge bring the edges down as well as the center and make a clean single pass cap if you want. :)
 
Got a few of the hideous door welds ground and re-done.  They're still not great, but they'll suffice.

Then got the FB mated up to the CC.   Traced the cut line on the inside and then dropped the FB back on a rolling cart.  I got it 25% cut out before I lost the day's light.  She'll be welded on this Saturday :)

 
Thanks for noticing that...I honestly fist-bumped the air when I pulled it together and there wasn't anything more that a 32nd gap here an there. :)
 
Hey gang....so I fitted up my plenum last night with cardboard (thanks for that inspiration 12ring)...(forgot to take a picture)

I've seen others go ahead and fabricate the plenum on the table and then mount to the smoker.  I'm honestly not that confident in my own fabrication skills so I'm thinking about piecing it together on the smoker itself.  Plus, this is going into a domed piece of steel...so there are a whole lot of angles/radiuses to consider.  So below is my plan...can you let me know if you see me walking into a pitfall? :)

To deal with all the various radiuses...I am just going to fabricate a little bigger and then weld the plenum pieces into the tank.  Once it's all said and done, I'll then just take an angle grinder to the inside and grind it down nice and smooth.

- Fabricate and install the left and right vertical sides of the plenum and tack in place...paying attention that the horizontal tops of each are level/square, and in plane with each other.

- Cut the top to shape and fine tune with grinder.  Cut out 5" hole for stack, and then tack in place.

- Fabricate and fine tune the outside vertical piece (3" wide) and tack in place.

- Fabricate and fine tune the bottom piece (2" wide) and tack in place.

- Fabricate and fine tune the larger angled piece and tack in place.

- Verify all looks good and proceed with welding the whole thing together

- Set the 5" pipe and weld in place.

Lastly....as far as the pipe goes...feldon is calling for 31 inches.  I have a 36" section of pipe.  In my head...I can easily remove material...but it's harder to add length.  Does it make sense to weld on the full 36" pipe and proceed with testing.  If it's too long...just a matter of cutting off what's needed to dial it in.  Or...have you guys found over the years that the calculator really is not wrong and I would be better off just cutting it down to 31 right off the bat before install?

Thanks all....and pictures will follow.

Kevin
 
Your lay out will work on the plenum Kevin.

I have never had a problem with the calculators findings. Personally I would cut the pipe but if you want to see if the 36" suits your needs leave it and take it off later if you choose to do so. :)
 
SmokingMeatForums.com is reader supported and as an Amazon Associate, we may earn commissions from qualifying purchases.

Hot Threads

Clicky