OKJ Bandera Vertical Offset - Best Mod of the Water Pan

  • Some of the links on this forum allow SMF, at no cost to you, to earn a small commission when you click through and make a purchase. Let me know if you have any questions about this.
SMF is reader-supported. When you buy through links on our site, we may earn an affiliate commission.

Meniscus

Fire Starter
Original poster
Mar 2, 2023
36
19
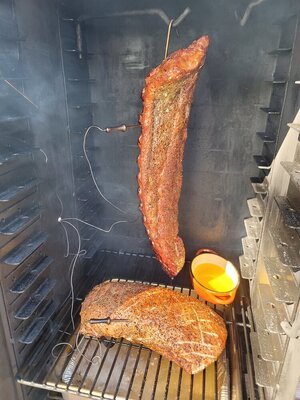
After nearly 100 sessions on the Oklahoma Joes Bandera Vertical Offset, I have two recommended modifications that made a huge difference in my cooks.

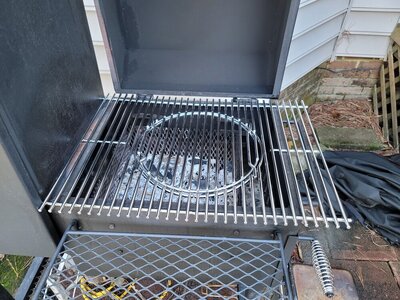
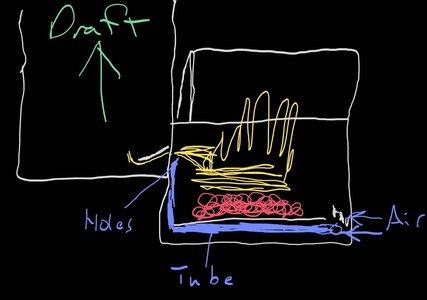
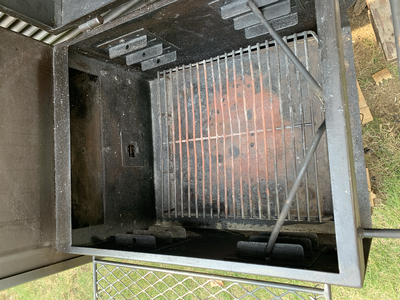
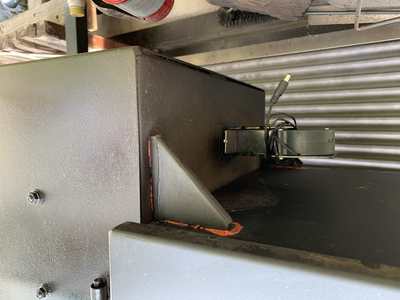
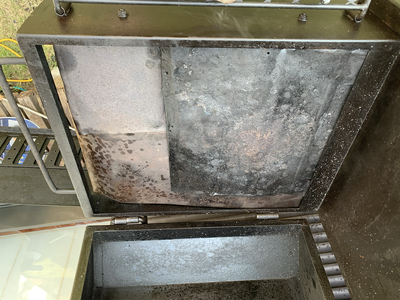
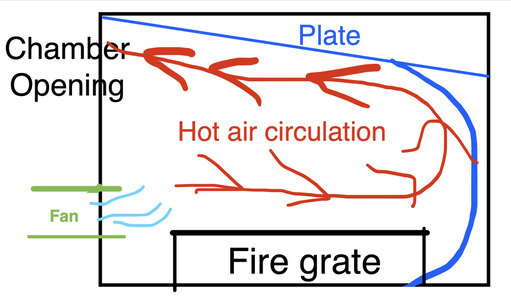
1. Instead of using the provided round water pan, I would recommend purchasing a 2/3rd size steam pan. As shown in the provided picture, it fits perfectly on the provided water pan bracket and when placed centered (from front to back), the result is very even temps with no hot spots in the entire smoking chamber from side to side or from top to bottom. Any excess draft that may draw the fire into the vertical smoking chamber is diffused under the water pan and is evenly distributed along the sides of the smoker.

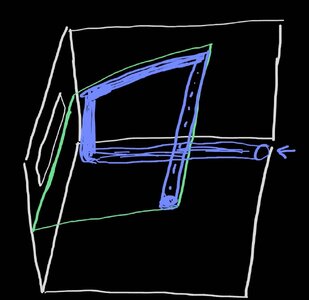
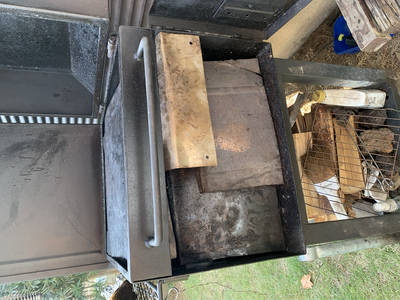
2. Since a lot of heat is lost due to the lid for the firebox, I chose to employ a metal plate. I placed a handle on one side so that it is easy to lift up. As a bonus, the existing lid will hold the plate up while working in the firebox. This single mod vastly improved the airflow and also provided an easy way to preheat smaller splits before they go into the firebox or add an additional surface as a griddle or for pots/pans.

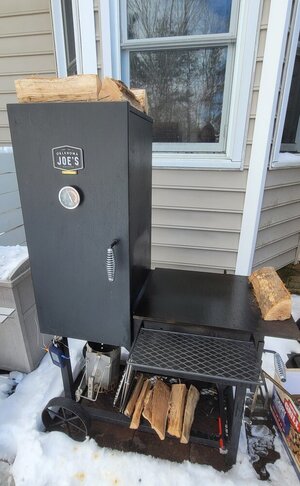
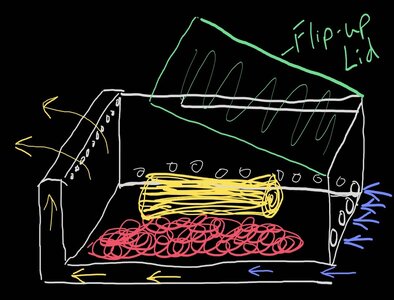
Last, I would highly recommend the use of expanded metal for a charcoal basket. It allows me to focus the fire and burn just wood splits for the duration of the cook (after starting with a half chimney of lump charcoal). It also allows me to prop up the small wood splits on the left side, directly over the coals, and run a clean fire. In addition, if you are running a low and slow fire, you can put a small split on the right, near the intake, to preheat for a cleaner fire when moved into the fire on the left.

20230603_143726.jpg
20231010_160031.jpg
20210717_162244.jpg


I hope that this is helpful. Please let me know if you have any questions.
 
Last edited by a moderator:
  • Like
Reactions: willy2763
Interesting. I just saw a used one for sale either on FB or offer up and was wondering how well they worked. I have never used any type of offset before.
 
If you've never run an offset, there is certainly a learning curve, but nothing you cannot overcome by using some diligence. As it relates to a vertical offset, there is a very strong draft and once the pit comes up to temp, it is very consistent throughout the smoking chamber. Unlike a horizontal offset, there is much less error as is normally associated with how heat rises and moves through a horizontal cooking chamber. Having run larger horizontal offsets (500g) and worked with others overnight who run even larger (1000g), the vertical offset is certainly an excellent place to start. Like all things, you are managing a live fire which, simply put, means you're managing fuel (lump/wood and air) and heat output (BTUs).

As is the case with any offset, you will need to consider the amount of wood you will consume as it is much higher than a grill, smaller smoker, or kamado. If you're prepared to monitor the fire and feed it every 25-30 mins, then there's very little comparison to other types of cookers.

As it relates to the OKJ Bandera, I would estimate that at a low and slow temp (225-235), you'll consume around 2+ regular wood splits (broken down into smaller splits to maintain a 'clean' burn and smoke) per hour. So, if you were going to do racks of baby back ribs, that equates to roughly 10-12 regular wood splits (around 1 cubic feet) over a 5.5 hour period (assuming that you use around 3/4 chimney of lump to start the coal bed and an hour to bring the pit up to temp and stabilized before adding meat).

I hope this is helpful. I find that the OKJ Bandera is very capable and is a great learning platform for how to get a clean burning fire (blue smoke). It is also very rewarding with the results. However, like any offset, there is a commitment of time and fuel resources to achieve the results.
 
I will also add that if you do not do the mod where I'm using a plate over the firebox and you use it as it comes (with the lid), then the fuel consumption is much higher, say 35% I'm guessing.
 
Hi. I have the same smoker. I’ll have to try a rectangular pan to see how that works. I do use a rectangle drip pan when doing a turkey and don’t notice a difference in heat distribution.
I also use some metal plates in the top of the firebox slightly angled up towards the smoking chamber. I think that vastly improves airflow and efficiency. I need to do something more permanent for that though. Doing that while being able to close the lid gives you a nice little oven up there to bake things in!

One thing I’ve been thinking of lately is how the baffle/ shield is angled going from the firebox to the smoke chamber. I wonder if it was flat instead of angled down it would better airflow even more? What do you think?
 
Before I started using the 2/3rd size steam/hotel pan as a water pan, the strong draft of the vertical smoking chamber would pull the flames from the firebox under the baffle/shield plate. I typically gather my burning embers to the left side of the firebox when I put new splits on. Then I put a split or two towards the intake door on the right where the fresh air is coming in. They don't burn there, the splits just heat up so that the next time I feed the fire, they catch within 10-15 seconds. That said, I think that if the baffle/shield was flat, it would lead to more inconsistent temps throughout the vertical smoking chamber. From my perspective, this could be a benefit if you're smoking two different meats and wanted a slightly cooler zone to the left and bottom of the vertical smoking chamber. Otherwise, if you desire more consistent temps throughout, then I would leave the baffle/shield angled down. I took a screenshot of a video I have showing the round water pan and the flames getting sucked under the baffle/shield. You can see that with the baffle/shield angled down, the flames are forced down as opposed to being allowed to come straight up the side.

When I switched to the 2/3rd size square steam/hotel pan (positioned in the center from front to back), any live flames that are drawn into the vertical smoking chamber are diffused across the entire bottom of the water pan. The heat and smoke draw up at the front and back of the smoking chamber and I have found this is the most useful configuration. It is important to realize that the 2/3rd size pan completely blocks all rising heat from both the left and right sides and I wonder if the rectangular pan you've used previously may leave a gap. If it does, then maybe sliding it against the right wall of the vertical smoking chamber on the firebox side would have different results. I've put as many as 8 digital thermometers at all locations in the vertical smoke chamber and in my configuration and I only see around 5 degrees of difference throughout, from top to bottom and side to side. I've also tried biscuits and they all cook evenly unless you put one within 2 inches of the back or front at the lowest grate location possible over the water pan (because all the heat is coming up in those areas). I've hung as many as a dozen baby back ribs and they all cook evenly and at the same rate. In addition, I've laid 4 baby back ribs and a couple spare ribs on the grates and again, they all cook evenly. (Note that the spare ribs cook for longer than the baby backs, but that is to be expected.)

In the 3rd picture, you can see the size splits that I'm running. As long as they are preheated before being added over the burning embers, I'm able to burn just wood for the duration of the cook. I start with half of a full size Weber chimney using lump. After fully ignited, I dump into my charcoal basket on the left side of the firebox. From then on, I'm only burning the splits in the size you see in the picture. (Note: I was running the vertical offset hotter on this day since I was hanging several chickens inside.)

As a bonus, I've included a grate I found on clearance at Lowes for a very low price. I can't remember what grill it was meant for, but if someone is interested, I can try to figure that out. I thought it was convenient to be able to lift the center round section and access the fire when grilling in just the firebox. I also use the center round section of the grate right on top of my full-size Weber chimney for a quick sear on steaks, etc.

I hope all of this makes sense. Admittedly, this configuration using the 2/3rd size pan works for me, but it may not be the best configuration for you. Just because it works for one person doesn't mean that it is the best solution for everyone else. I'm happy to answer any additional questions you may have and I'm always open to ideas for collaboration. :)
 

Attachments

  • 20230311_094250.jpg
    20230311_094250.jpg
    173.8 KB · Views: 63
  • Screenshot_20231031_084940_Gallery.jpg
    Screenshot_20231031_084940_Gallery.jpg
    149.3 KB · Views: 59
  • 20220122_115727.jpg
    20220122_115727.jpg
    120 KB · Views: 60
  • 20211212_131330.jpg
    20211212_131330.jpg
    205.3 KB · Views: 59
Ah, that makes sense the way you are running your fire.
For me, I tend to have my fire more towards the center of the firebox. Main reason is because I have a blower that is attached to the left wall of the firebox, also because I feel it gives a more indirect/ even heat. I'll also have some wood or charcoal placed out of reach of the fire to have at the ready whenever it is needed.
Due to having the blower on the left side of the box I am wanting to add a curved plate to the firebox door in addition to the plates I mentioned in the previous post angled upwards to direct the air and heat into the smoke chamber. I'm trying to think of the best way to go about it all before committing to making a more permanent setup. As of now, I have scrap pieces that I MacGyver into place.
I was wanting to move the blower to the door, but then it would be sticking out in the way. I like how it is tucked away under the chamber so I don't need to worry about it.
Definitely open to bouncing ideas off each other as well as collaborations!
 
Interesting. I have a few questions:
  1. Do you have any pictures?
  2. Have you closed up the air intake on right side or blocked it in some way?
  3. Did you choose the put the blower on the left side because it was convenient under the vertical smoking chamber or was there a different reason why you chose the left side?
  4. Are you using a charcoal basket?
A couple of things for consideration:
  • It appears that at the present moment, you are thinking of things vertically as you consider baffle plates inside the firebox. All of which may make fire management more difficult. Have you considered segregating the firebox so that the baffles are sitting upright? This would limit the amount of area for fuel, but it would have two effects: 1. It would condense the fire; 2. It would allow for a better air flow into the smoking chamber.
  • If you aren't already, blocking the vents on the side firebox door on the right could be helpful. This could easily be done (for testing purposes) by simply using foil to completely cover and close the door capturing the foil or crumpling the foil in each of the holes when the intake vent is closed.
  • Last, if you are using a charcoal basket and you want to use a baffle in the firebox, then maybe installing a hinge just below the opening to the smoking chamber may be the answer. The loose end of the baffle would simply sit over the edge of your charcoal basket and the air would run across the baffle and then up to the area above before going to the smoking chamber.
I have a few other ideas, based on what I was considering to introduce secondary air and a secondary burn, but I will include those concepts in a separate post.
 
As promised, here are some of the other concepts I have considered. The reason for these concepts was striving to achieve a more efficient burn for 100% clean smoke at all time in the smoking chamber. Note: I'm not in love with these concepts, but I drew some quick sketches on my phone over a year ago. You may find that the pictures insight other ideas for your purposes. Be sure to read the very end of my post where I've pretty much decided what I may do at a later date, if I decide to implement the concept of secondary air.

Picture 1: You'll see a hinged baffle plate that would have been used to direct the fire directly over the holes you see to the left before the gasses go into the smoking chamber. Without going too much into the dynamics, the air would go under the burning embers under the fire to be preheated before rising up to where the holes are. At that point, the air would be preheated and act like an afterburner (much like the concept of a solo stove or a wood stove with secondary combustion). The obvious issue with this design is that it would be vastly inconvenient to lift the baffle plate every time you wanted or needed to add fuel. At the same time, the baffle plate would warp unless it was thick steel which makes it slightly more inconvenient as well.

Picture 2: In this picture, you can see a simplified design where the solution is implemented with a simple tube towards the back of the firebox. Again, the fresh air is heated by the fire, travels up to a fixed baffle plate, and sits right over the fire and flames as they turn the corner to go back towards the smoking chamber. The issue with this design is that access to the fire is very limited and you'd have to hunch down to slip splits using the firebox door which is far from convenient.

Picture 3: This is a derivative of the first design, only no baffle plate. Assuming that all of the gasses are forced through the rectangular opening going to the smoking chamber, this is the simplest design to test and should work just fine. There's no real downside that I see, assuming that the holes are properly sized and spaced for an even flow across the rectangular opening for an even secondary burn.

Last concept, and likely the one that I will try, is to use an infrared burner in front of the rectangular opening to the smoking chamber. After some extensive searching (casually looking over a few months), I found this option on Amazon: https://www.amazon.com/gp/product/B08C59LCZ8/ref=ox_sc_saved_title_5?smid=A2ITXOWU8ZFWBQ&th=1 (screenshot included for convenience). This is a rectangular shaped infrared burner. To feed the burner, I was thinking of using Schedule 40 Black Steel pipe in a snake pattern with 90 degree elbows under the fire. That would superheat the air going to the infrared burner and allow for a larger, even surface area for secondary combustion.

All of this being said, the primary reason why I haven't progressed forward with this concept is that my current setup works just fine. I get clean blue smoke out of the top of the smoking chamber and I'm not certain that the effort (and cost) would be worth it. However, I may revisit at a later date.
 

Attachments

  • Screenshot_20231101_082117_Amazon Shopping.jpg
    Screenshot_20231101_082117_Amazon Shopping.jpg
    70.3 KB · Views: 57
  • Secondary burn.jpg
    Secondary burn.jpg
    62.4 KB · Views: 47
  • Secondary burn, heating air.jpg
    Secondary burn, heating air.jpg
    73.1 KB · Views: 50
  • Firebox insert.jpg
    Firebox insert.jpg
    105.7 KB · Views: 57
Interesting. I have a few questions:
  1. Do you have any pictures?
  2. Have you closed up the air intake on right side or blocked it in some way?
  3. Did you choose the put the blower on the left side because it was convenient under the vertical smoking chamber or was there a different reason why you chose the left side?
  4. Are you using a charcoal basket?
A couple of things for consideration:
  • It appears that at the present moment, you are thinking of things vertically as you consider baffle plates inside the firebox. All of which may make fire management more difficult. Have you considered segregating the firebox so that the baffles are sitting upright? This would limit the amount of area for fuel, but it would have two effects: 1. It would condense the fire; 2. It would allow for a better air flow into the smoking chamber.
  • If you aren't already, blocking the vents on the side firebox door on the right could be helpful. This could easily be done (for testing purposes) by simply using foil to completely cover and close the door capturing the foil or crumpling the foil in each of the holes when the intake vent is closed.
  • Last, if you are using a charcoal basket and you want to use a baffle in the firebox, then maybe installing a hinge just below the opening to the smoking chamber may be the answer. The loose end of the baffle would simply sit over the edge of your charcoal basket and the air would run across the baffle and then up to the area above before going to the smoking chamber.
I have a few other ideas, based on what I was considering to introduce secondary air and a secondary burn, but I will include those concepts in a separate post.
Hey! Sorry so long. Got some pictures for you to see.
The first two you can see where the blower is installed. I got the smoker used from another member on this form actually and he had(I think it was him) the fan installed in that location. I like the location it is in now only because it is out of the way and protected from bumps etc. If it were up to me I would've wanted to install it onto the door where the vents are already just to follow the natural airflow of the smoker. I'd use the hole where it is to put a propane burner. But then it would be hanging out and I'd have to remove it every time it's not in use. I was trying to think of the best way to direct the airflow from the fan over the fire then up and into the smoke chamber. I thought of some type of ducting in the firebox, but that would ultimately take up too much space. I eventually decided on the setup I have now which is to let the air blow over the fire, then help direct it into the smoke chamber the smoothest way possible.
The next pictures show how I use the metal plates to direct the air. Everything is just scrap pieces haphazardly placed as of now that I remove when not in use. Whenever I get around to it I have some metal that I will use to make a one piece plate to go in the top of the fire box and a curved(think snowplow) piece that I want to attach to the door of the firebox.
I like this setup because it allows me to have a space above the plate while being able to close the lid where I can bake/ warm things. I don't mind using the door on the side of the firebox to feed the fire, plus I think opening the top lid to do so would only loose more heat.
I don't use a charcoal basket, but was thinking of trying one once the grate on mine gives up. Do you think it helps?
 

Attachments

  • tempImage7TfZQt.png
    tempImage7TfZQt.png
    1.3 MB · Views: 49
  • tempImageR0B58H.png
    tempImageR0B58H.png
    990.6 KB · Views: 47
  • tempImagezNLVc4.png
    tempImagezNLVc4.png
    1.2 MB · Views: 50
  • tempImageLdHMge.png
    tempImageLdHMge.png
    1.2 MB · Views: 49
  • tempImagesUGOD2.png
    tempImagesUGOD2.png
    1.3 MB · Views: 56
As promised, here are some of the other concepts I have considered. The reason for these concepts was striving to achieve a more efficient burn for 100% clean smoke at all time in the smoking chamber. Note: I'm not in love with these concepts, but I drew some quick sketches on my phone over a year ago. You may find that the pictures insight other ideas for your purposes. Be sure to read the very end of my post where I've pretty much decided what I may do at a later date, if I decide to implement the concept of secondary air.

Picture 1: You'll see a hinged baffle plate that would have been used to direct the fire directly over the holes you see to the left before the gasses go into the smoking chamber. Without going too much into the dynamics, the air would go under the burning embers under the fire to be preheated before rising up to where the holes are. At that point, the air would be preheated and act like an afterburner (much like the concept of a solo stove or a wood stove with secondary combustion). The obvious issue with this design is that it would be vastly inconvenient to lift the baffle plate every time you wanted or needed to add fuel. At the same time, the baffle plate would warp unless it was thick steel which makes it slightly more inconvenient as well.

Picture 2: In this picture, you can see a simplified design where the solution is implemented with a simple tube towards the back of the firebox. Again, the fresh air is heated by the fire, travels up to a fixed baffle plate, and sits right over the fire and flames as they turn the corner to go back towards the smoking chamber. The issue with this design is that access to the fire is very limited and you'd have to hunch down to slip splits using the firebox door which is far from convenient.

Picture 3: This is a derivative of the first design, only no baffle plate. Assuming that all of the gasses are forced through the rectangular opening going to the smoking chamber, this is the simplest design to test and should work just fine. There's no real downside that I see, assuming that the holes are properly sized and spaced for an even flow across the rectangular opening for an even secondary burn.

Last concept, and likely the one that I will try, is to use an infrared burner in front of the rectangular opening to the smoking chamber. After some extensive searching (casually looking over a few months), I found this option on Amazon: https://www.amazon.com/gp/product/B08C59LCZ8/ref=ox_sc_saved_title_5?smid=A2ITXOWU8ZFWBQ&th=1 (screenshot included for convenience). This is a rectangular shaped infrared burner. To feed the burner, I was thinking of using Schedule 40 Black Steel pipe in a snake pattern with 90 degree elbows under the fire. That would superheat the air going to the infrared burner and allow for a larger, even surface area for secondary combustion.

All of this being said, the primary reason why I haven't progressed forward with this concept is that my current setup works just fine. I get clean blue smoke out of the top of the smoking chamber and I'm not certain that the effort (and cost) would be worth it. However, I may revisit at a later date.
Interesting concepts. I'm having difficulty fully imagining how some would work despite your excellent drawings(I do the same!). Admittedly I'm no thermodynamics engineer, but I have a grasp of how it works. I'm not too familiar with Seems like you are wanting to supercharge your fire or airflow right? If you are thinking of an engine it would be no different than adding forced induction to it. I can see why you'd want to do that if you aren't happy with the temps or efficiency of the fire. I feel that this smoker already does an excellent job of doing so on its own. With mine I am using a blower with the Fireboard thermometer to control the airflow. Using this almost feels like cheating. You don't need to worry about if the vents are open enough, besides the top vent of course. You set a temperature ,make sure there's enough fuel and let it run.
Besides that I am trying to focus on the best airflow possible, build upon the already good design of the smoker. So directing that the smoothest way into the smoke chamber is my goal. Like I posted in my reply, you can see what I have come up with do do so.
Other things I've been thinking of is to remove the lip in the top-inside of the firebox where it's connected to the smoke chamber. Only thing about that is how to secure the two together after the lip and bolts are removed. Maybe an L bracket bolted on the outside?
With the plate I am wanting to make that goes over the fire, I thought of extending that to replace the shield that is in the smoke chamber. That way there's one continuous-smooth path for the air to follow.
I'm attaching a drawing of my own to help better see what I am thinking of.

Another thing I don't think I've mentioned is that I use some pans inside the smoke chamber to block-off portions of it. Not completely block of course but effectively shrinking the size of the chamber. Whenever I am doing small cooks I do this to help with efficiency, I think it especially helps when it's cold outside. Instead of heating the whole chamber, you are dealing with a smaller area.
 

Attachments

  • Screenshot 2023-11-06 at 10.26.14.png
    Screenshot 2023-11-06 at 10.26.14.png
    141.8 KB · Views: 61
Thank you for the pictures. This helps a lot in visualizing the setup you're using. For the record, my drawings were made just for me and were not meant to be posted or shared, but considering your conundrum, I thought it might be prudent to share.

Considering that you are asking the hot air to change directions, it seems like a lot of trouble (and perhaps inconvenience) to add a top plate or baffle. I think a simple plate on top of the firebox would suffice as long as you seal-up the door really well. If you're not using the door, then some aluminum foil would certainly close the gaps.

Unless you move the fan to the other side, I don't see where any difference would be made by implementing multiple baffles. At the end of the day, if you can get the door sealed well and also ensure no leaks for the firebox lid, then the air will just roll inside the firebox and the hotter air will go into the smoking chamber. What also promotes this is when the smoking chamber comes up to temp and creates a good draft. In my book, simplicity is the answer, whenever it is feasible.

Regarding whether or not a charcoal basket could help, I think it would. I find that the smaller grid of the extruded metal allows for a more complete burn of the embers before the ash falls into the ash pan. I still use the provided charcoal grate that comes with the smoker. The charcoal basket does help a great deal to consolidate the fire so that new splits or fuel reach a higher temperature sooner.

Regarding some of my concepts and designs, the single goal is to get an even cleaner fire and to add a secondary burn to further purify the burning gases. Otherwise, my current setup runs great and I have no issues with running and sustaining temps from 200 degrees up to 375 degrees or so. Once I find the temp I want, it is very easy to maintain without a fan or other intervention.

If you were to employ a charcoal basket, I would first try a V-shaped charcoal basket by taking two pieces of extruded metal and angle them so that all burning embers come together and are consolidated so that any new splits or fuel have a nice continuous coal bed for instant lighting. I would also recommend preheating your splits so that they catch quickly and easily.

I'm not sure what else to suggest other than dividing the firebox so that the air coming in from your fan blows across the front of the firebox and then go around and to the back of the firebox before going to the smoking chamber. This would create a big vortex spinning counter-clockwise.

I hope this is helpful. If in doubt, I try to simply everything so that my solutions are repeatable in all conditions, regardless of the quality, dryness of fuel, and environmental factors outside the smoker.
Please, I hope you are not offended by my comment of your drawings, I was only jesting. I can't draw worth nothing. But just from drawings it's a bit difficult to see what's going on. Good ideas regardless! Thank you.

I think you may be misunderstanding what I'm doing with my fire box. Sure the fan is blowing the opposite direction of the vents on the door, but I'm still using the natural rise of the heated air only directing that to the smoke chamber, making a counter-clockwise vortex as you said.
I'm not utilizing any baffles. Basically the same way you are doing with the plate on top of your firebox, just mine is inside and angled upwards to the smoke chamber which takes advantage of the naturally rising air. I too prefer simple functionality vs any complicated setups that may not have much benefit to them.
I agree that this smoker is already very efficient on its own and every once in a while I'll run it without the fan using only the vents on the door. With the temperature controlled fan, you get the most efficient burn while not having to fuss with opening- closing vents.
I also pre-heat my wood/ charcoal either on top of the firebox or inside the box itself. It definitely helps getting them burning quicker!
I think I may try the charcoal basket next.

For your goal of trying to achieve an even cleaner burn than you are already getting, I recommend you try a blower. That alone will make the biggest difference regardless in smoker type or design.

Have you thought any about the rigidity of the smoker as a whole? There is some flex to my unit, if it's not on level ground the doors have a difficult time closing/ lining up. I had thought about adding some steel bars to the base and cabinet to help stiffen it up....

Also the base of mine is getting a little flakey in the corners by the feet and wheels. I'll need to address that soon. How's yours?
 
Not offended at all. I was simply quantifying my drawings as not meant for general consumption. LOL

I haven't had any issues with rigidity. Mine sits in the same spot, on pavers and it stays outside all the time with a cover. Haven't had any flaking, but I am very diligent about covering after it cools down (usually the next day before rain or covered as soon as it dries from rain). I do use a light coating of spray vegetable oil on everything, inside and out, but only every couple months. However, I do spray the outside of the firebox almost every time to prevent rust and preserve the coating (like you would with a cast iron pan). If you do have a few suspect spots, then scrape off anything that is flaking, cover with vegetable oil, and if it is not an area of the smoker that sees heat (like wheels, lower rack, frame, etc.), then just take a blow torch to lightly heat. That will create and maintain a nice coating. I also use a light pressure washer in the smoking chamber periodically. Immediately after, I coat with spray vegetable oil and run a hot fire.

The only thing that has ever really been an issue for rust is the provided deflector plate coming from the firebox into the smoking chamber. My original one is quite rusty due to the heat. I was wrapping it with some foil with vegetable oil sprayed under the foil, but I ordered a new one about 6 months ago. I still have the old one and although it is thin metal, it is still functional.
Ah yeah. It helps if it's left on solid ground. I am constantly moving mine around because it doesn't have a permanent home yet. When it is not fairly level I can tell by how the doors line up, especially the firebox door. If it's flexing enough there can be a 1/2" gap on the top.
I do plan on making a permanent spot with a concrete pad at some point.
I also do the same as you and spray/ wipe it down with oil to keep the rust at bay. For the inside I use veg oil. The outside I use mineral oil. I had thought of trying to repaint with a high-temp paint, but I like the finish with the oil. The paint would most likely not last very long anyway. My deflector plate is also very crispy and probably needs replacing soon. There's a nice built-up layer of burnt oil and grease covering it though that is holding it together. I'll leave it for now until I make my plate for the firebox.
That's an idea, of removing the rust from the feet and treating it with oil, I actually have wiped some oil on the areas already. I fear it's too late for that though. Don't really want the thing falling over suddenly!
Did you see my earlier comment about using pans in the smoke chamber to shrink it down depending on what you are cooking? Not sure of how much you usually cook at once, but it could help if you are making small things. Save fuel and whatnot.
 
Yes, I did seen your note on pans. However, I usually don't have a need to reduce the interior space. I have a few other grills and smokers and I only use my vertical offset when I cook several items at once. For the way I use the Bandera (and now that I'm using this other water pan), the heat is very consistent from top to bottom in the smoking chamber so I don't know that any fuel savings would matter. Once the whole pit comes up to temp, it's not a lot of fuel in the grand scheme of things, especially compared to a traditional offset. I attribute this primarily to the strong draft inherent of the design of a vertical smoker. This rising column of hot air makes for a very nice draft in the firebox. For 225-250, I typically have to choke the exhaust to about 2/3rds open because even with the firebox intake vents nearly closed, the draft is so strong, it sucks in lots of air. As stated, I usually run the exhaust at 2/3rd and the intake on the firebox at just over 1/2 open. For anyone else reading this, keep in mind that I'm using a metal plate over the firebox. If you didn't use a plate and were just running the lid, then I would expect that you would ned to run the vents wider open.
 
Yes, I did seen your note on pans. However, I usually don't have a need to reduce the interior space. I have a few other grills and smokers and I only use my vertical offset when I cook several items at once. For the way I use the Bandera (and now that I'm using this other water pan), the heat is very consistent from top to bottom in the smoking chamber so I don't know that any fuel savings would matter. Once the whole pit comes up to temp, it's not a lot of fuel in the grand scheme of things, especially compared to a traditional offset. I attribute this primarily to the strong draft inherent of the design of a vertical smoker. This rising column of hot air makes for a very nice draft in the firebox. For 225-250, I typically have to choke the exhaust to about 2/3rds open because even with the firebox intake vents nearly closed, the draft is so strong, it sucks in lots of air. As stated, I usually run the exhaust at 2/3rd and the intake on the firebox at just over 1/2 open. For anyone else reading this, keep in mind that I'm using a metal plate over the firebox. If you didn't use a plate and were just running the lid, then I would expect that you would ned to run the vents wider open.
Yeah, It depends on how much you cook. I use this smoker for all my cooks, no matter how small so I adjust accordingly.
I was amazed when I first used this smoker at how efficient it is compared to a horizontal offset. Have you ever used a combo horizontal- vertical offset? I wonder if it has the same airflow as the vertical alone?
I too run it with the top vent at about half open. The only real bad design with this smoker is the firebox I'd say. The way the top lid is so much higher than the opening to the smoke chamber really doesn't make much sense in terms of airflow. Easy fix with the plat over the top though! I recommend everyone who has this smoker to run it that way.
 
Unfortunately, no I have not used a combination horizontal and vertical offset, but I've used many different offsets of significant size. Of all of those, I used a 500 gallon one that had a very tall stack which had a similar draft as the vertical offset. However, I haven't used very many vertical offsets other than this one and an occasional one at a friend's house (but not enough to draw any overall conclusions). Yes, I agree, I highly recommend using some sort of plate over the firebox for the OKJ Bandera.
 
SmokingMeatForums.com is reader supported and as an Amazon Associate, we may earn commissions from qualifying purchases.

Latest posts

Hot Threads

Clicky