Not SO Mini Smokehouse Build w/Pics

  • Some of the links on this forum allow SMF, at no cost to you, to earn a small commission when you click through and make a purchase. Let me know if you have any questions about this.
SMF is reader-supported. When you buy through links on our site, we may earn an affiliate commission.
Thank you all for the kind words.......we had fun with it.....

For the first smoke it was supposed to be Mac and cheese beef fatties. But due to the issue with the connectors we did them in the off set smoker....... I am off Wednesday and Thursday so will have to burn it out and cook something in it....I need to figure out the little tricks before Cassie comes back in 2 weeks........I may end up ordering the maverick and some pellets......oh darn more toys....
 
Jeramy, good job on the smoker....  I like the color...  It should blend in with the spring flowers...  "ninja smokehouse" .....  Dave
 
Wow that has to be the PRETTIEST Smoker I have ever seen. I like the color choice. You two did a great job...JJ
 
Thanks guys...... It is hard for me to stay away from using purple at my house. My wife and youngest daughter are all about the purple. The High School colors for my daughters have purple in it....... It was supposed to be a darker purple, but it did not turn out that way......

I honestly did not care what color it was, as long as Cassie stayed involved and she did. So we have the "PRETTIEST" Awesomist Smokehouse you could find!!!!!!

Thank you all for your posts, threads and guidance. It really helped make this experience much easier to learn from what others did.
 
Jeramy and Cassie, congratulations on a spectacular looking Smokehouse. You both did a great job and it should be lots of fun firing it up and getting the TBS going. I look forward to the first smoke in this fine piece of smoking equipment!!! 
icon14.gif
 
I was able to get the burner up and running today. WOW it does hot the chamber hot fast. I actually had to turn off the center burner just to keep it at 300 degrees......l am really looking forward to more testing tomorrow........

I did find a very interesting side effect, don't know if it is a good or bad one. When the chamber was hot the sap from the shelf support rods started to come out. Don't think I want this in my food.

So my question is...... Will the sap eventually stop oozing out or will it keep coming out? I may look at another option in place of the self made wood rods......
 
Jeramy.....  The sap will eventually either ooze out or harden....  Sap is Amber...  the stuff that holds the secret to past millenia....  Run the smoker at your expected max operating temp for a day or so...  what oozes out should be the end of it....   Have everything bolted or screwed together tight.... especially the doors.....  You want to stop the warping during the drying process...   When I moved to Eastern Wa, my buddy moved here at the same time....  his browning o/u shotgun was disassembled in the gun case.... by the time he used it, the forearm wouldn't fit... he had to have a gunsmith refit the forearm because of the warping and twisting.... 
 
Jeramy.....  The sap will eventually either ooze out or harden....  Sap is Amber...  the stuff that holds the secret to past millenia....  Run the smoker at your expected max operating temp for a day or so...  what oozes out should be the end of it....   Have everything bolted or screwed together tight.... especially the doors.....  You want to stop the warping during the drying process...   When I moved to Eastern Wa, my buddy moved here at the same time....  his browning o/u shotgun was disassembled in the gun case.... by the time he used it, the forearm wouldn't fit... he had to have a gunsmith refit the forearm because of the warping and twisting.... 


Dave thank you for the info......you are always a good resource ...... Funny you mention the warping........ I just went and checked it out and noticed the top of the door was hotter then the rest......,when I had it open I noticed the door we cut out was pulling away from the trim........looks like the brad nails were not enough........go figure.......so tomorrow I will add some screws to hold them together and hopefully correct this......l am also going to cut some rebar to use for the bottom shelf support and cut a heat deflector plate......I have some 1/8" steel plate I can use for now........ I am looking for a pan I can use with some sand for a deflector/heat mass.......
 
I love the smoke house!  Its soooo cute!  Love the two tone!

Cant wait to see Cassie and her Fatties!

Kat
 
Make sure you install some overlapping drip pans you can line with foil to make cleanup easy after it cools down!  Or, foil pans and toss.
 
Did a few planned and unplanned adjustments after doing a test firing of the burner the past couple days..... here are the adjustments....

First  was to address the door warping inwards and pulling away from the trim. I put a few screws in it and seems to be fixed. Cassie and I were planning on doing some touch up painting the next time she is here. Looks like we have a bit more to add to it.......


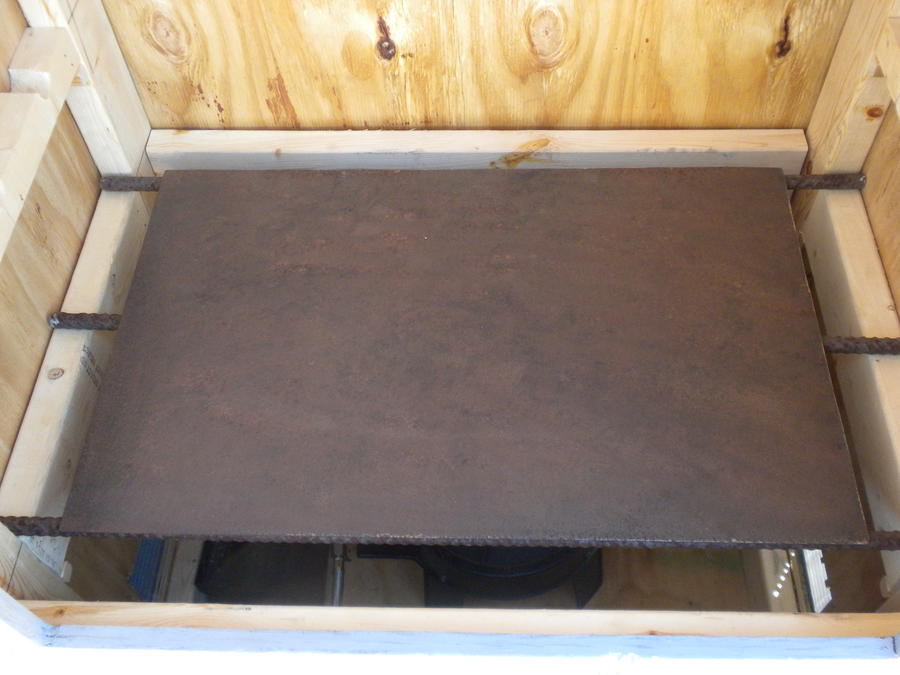
I was planning on using a drip pan of sorts for the deflector plate. I have not been able to find what I want, so I cut a piece of 1/8" plate we had around for a temp one. I will place a drip pan under the food for now....... I left a 2" gap around all 4 edges for the heat and smoke to flow.......


I had thought about making a shelf when we are doing the build to hold the Mavericks or iGrills when I get them. I was waiting for my Father-In Law to show up so I could help him. So I used some of the scraps I had left to build a shelf. Cassie wanted to use the drill, but never said anything as we were building. So the shelf will sit there till she comes over and can attach it to the smoker.


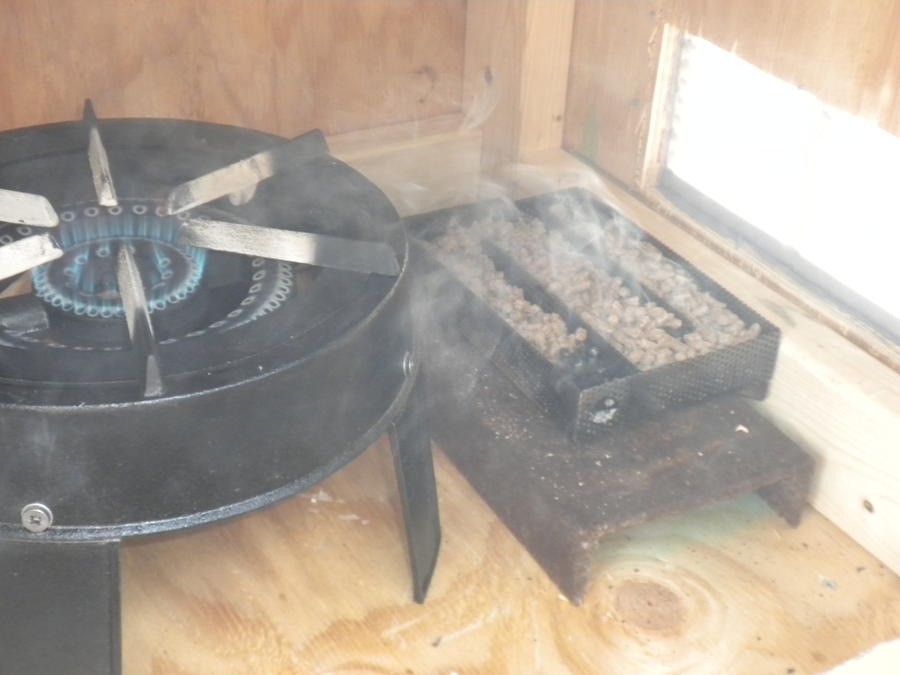
When I had it fired up the other night and the next morning, it was able to get to 350+ with no issues. I eventually had to turn off 2 of the 3 burners. It looks like I will only need to use the center burner to keep it at a hot smoke temp of 250, and that is at almost the lowest setting I can get the needle valve to. I am going to look into replacing the needle valve with a smaller one for better control. The burner works very well at low to medium settings. As soon as I try to run it on turbo (not really needed, but wanted to see what it could do) it runs very rough. I have adjusted the air intakes on the bottom, but only really notice the adjustments on the lower settings. Not sure if that is normal for this burner.......overall very happy with it......

OK sidetrack story time: The other day I was talking with someone about the smokehouse. I used the term "well my smokehouse" and Cassie walked up and stopped me and said "OUR smokehouse".......the person I was talking with looks at me and says with a smile "well you were just told"......all I could do is laugh and say"yes, yes I was"............I am happy with how it has turned out, but I am more happy with the fact she has taken ownership of it and is sticking with it.......we did get to cook fatties the other day, just not in the new smokehouse......
 
  • Like
Reactions: kingfishcam
I made a couple little modifications. Cassie mounted the shelf and I made some access points for the remote thermometer probes.

The shelf came out nice. I need to find a way to hang some tongs on it.....I don't like hooks......


I bought 2ea 1/2" x 3/8" black bushings and the appropriate plugs. I cut a notch out with a cut off wheel and painted with some black paint. It was an idea I had for the propane tank smoker. Figured I would give it a shot here. 


Drilled a hole to mach the inside of the threads, so I could screw it into the wood.I think it was 3/4".......


Screwed in the bushing.


The leads with the plug inserted......


I think it came out very well. I am going to look at this for my future builds......


A view of the AMNPS going......


worked out very well. Did not have an issue with it going out. It actually burned faster. If you notice I had it right next to the 2x4, and yes the 2x4 did get burned. Lesson learned to not put it up against the board......


The AMNPS did very well. However I am used to a lot more smoke flavor in my cooks. Will have to consider options to get more smoke......
 
I did not notice if you are using a pan on top of the burner for smoke.  I have a very similar smokehouse set up with Northern tools burner and I use a 12" cast iron skillet on top of the burner.  I use large chunks of wood for smoke.  I can have as much smoke as I want.  Typically 2 or 3 chunks (about 2" x 3") gives me just the right amount of smoke for TBS.  When I tried a few more pieces I think I had too much smoke.  The  chunks typically last somewhere around an hour depending on the size.  We can get large bags of smoking wood chunks from HD for $16 so it is cost effective.  They have a pretty selection of woods also.  I had the skillet that wasn't being used but I have seen them at Value Village.
 
SmokingMeatForums.com is reader supported and as an Amazon Associate, we may earn commissions from qualifying purchases.

Hot Threads

Clicky