New Brinkmann Trailmaster Vertical Smoker

  • Some of the links on this forum allow SMF, at no cost to you, to earn a small commission when you click through and make a purchase. Let me know if you have any questions about this.
SMF is reader-supported. When you buy through links on our site, we may earn an affiliate commission.
I found this forum a week or so ago and have been getting caught up on this and the Brinkmann TMLE.. I think I've decided to go with this over the TMLE..  Has anyone done a thermometer swap on tis?  Is it needed?

I'm thinking of painting the whole thing with the 2000 degree engine paint.  Do i want to throw additional coats on the inside before seasoning it, or should I mainly worry about the outside?  Looking forward to firing this up after vacation in a couple weeks.
 
My 2 cents .....NO. burn it cure it first. After a few runs you will see where touch ups are needed. I recomend the krylon high temp paint .made for grills.interior is a waste of time.steel brush the rust / burn areas on the exterior and give it 24 hours.
.

.
 
I found this forum a week or so ago and have been getting caught up on this and the Brinkmann TMLE.. I think I've decided to go with this over the TMLE..  Has anyone done a thermometer swap on tis?  Is it needed?

I'm thinking of painting the whole thing with the 2000 degree engine paint.  Do i want to throw additional coats on the inside before seasoning it, or should I mainly worry about the outside?  Looking forward to firing this up after vacation in a couple weeks.

Hey Jack
I don't look at the thermometer much, I use a remote thermometer, but the one that comes with the unit is within about 20° of the remote. As for painting, if it was me I definitely would not paint the inside. Even on the outside I just sand mine down after it cools down and rub on some peanut oil,seems to work pretty well for keeping the rust in control.
 
Hello to all ....I just got my "New Brinkmann Trailmaster Vertical Smoker" about a week ago and been doing a lot of work on it...... Will do my 1st smoke this weekend....Pictures coming soon.
Good evening to all the vertical smokers. .... well I did my 1st smoke on the vertical last weekend. ... still need to do a few modifications. ... I must get a party Q or the IQ120. I really need to review the 2.... Do any one have a good information on them?..... The coals I used was trash. .... kingford original way way to much ash!!!!!!!!! Here are some pictures. ... PorkButt, Beer chicken, Deer/pork sausage, alligator sausage, pork chops ..... let me know what you all think? ???
 
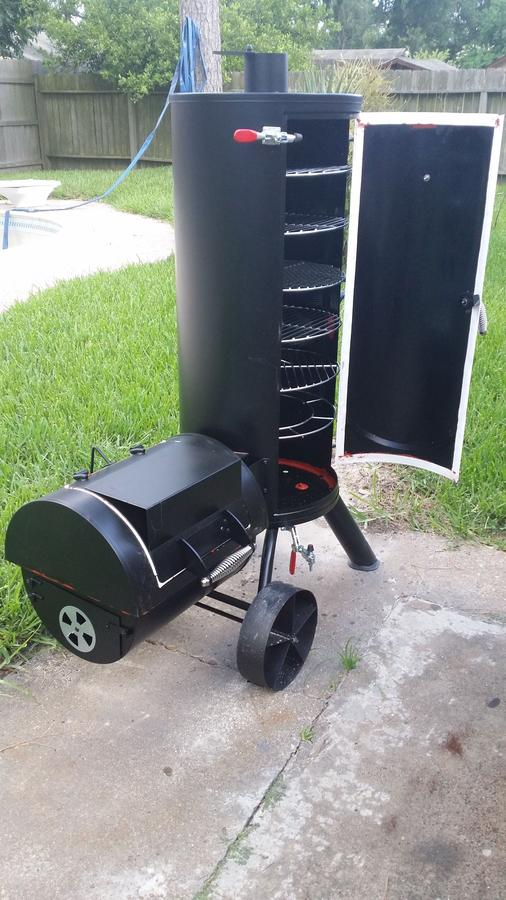
Here are my thoughts on the BBQ Guru DigiQ DX2 used with the Brinkmann Trailblazer Vertical.  Get one. It works. Well.

The install went as planned.  My first debate was which size fan to get.  There isn't a specific mod on the BBG Guru site for this smoker so I asked around on their site for some help.  Most people came back with the same answer.  Get the 25 CFM fan and you can always damper it down.  Well, I'm finished with my first "test" cook and it worked well but I'm not totally sure the 25 CFM is needed.  I also don't think it hurts.  It did turn on and off a lot though.  I'll move on to the install and deal with the fan as I get some more info. Yard and Pool dot com sell it and if you're a first time customer you can get 5% off.  All Things BBQ also has it. Both are cheaper than buying from BBG Guru. Be sure to buy the kit with the Bulkhead Inducer Mounting Tube.  That's what I used and the most likely of what was offered to with with this smoker.  The DigiQ does need electricity.  It's not battery operated.

View media item 328500
View media item 328501
The fan inducer mounting tube needs to be installed just below the fire box grate but well above the bottom to be clear of accumulating ash.  That's a challenge on this smoker as there isn't much room because of the damper so I decided to drill right thru the damper.  Once installed the damper should always be closed anyway.  If somehow I screwed up I could always buy a new fire box door and start again.  Using the damper also allowed the fan to be placed in the center.

View media item 328503
View media item 328504
View media item 328502
One of the things I did not have was a proper 1 3/8 metal hole saw.  DO NOT SCREW AROUND ON THIS PART.  Borrow or buy a 1 3/8 metal hole saw. Do not try and do it with a straight saw or a slightly smaller or larger hole saw.  Only use a metal hole saw.  Any other type will be eaten up for sure.

View media item 328506
View media item 328507
Take the door off the smoker and work on a bench of possible. I secured the door to the bench by putting a screw in the latch hole and putting screws above and below the latches.  This way the door wouldn't move when being drilled.  This is important because you'll only have one shot at getting this right because there's only an 1/8 inch of clearance left before you won't have any room around the hole to screw the enduser in.

Once you've got the center of the damper driller out you should have a thin section of it left around the whole to put the inducer tube thru as seen below.  Next you need to attach the damper in the closed position and drill out the center of it.  This needs to be done because there can be no holes on the door except for the inducer tube. Before drilling out the center you need to screws the damper handle to the door.  I did this with by hammering down the damper handle/tab and screwing it to the door with a self tapping metal screw (seen below).  BE SURE TO DO IT WITH THE DAMPER CLOSED. See below.

View media item 328508
View media item 328505
View media item 328509
Then drill out the center just like you drilled out the door.

View media item 328510
Next attach the inducer tube to the outside of the door as seen below.  The hardest part is moving the retaining ring if you don't have a pair of retaining ring pliers.  I had to buy a pair.  It must be moved right up against the door.

View media item 328511
Here's a look at the inside.

View media item 328512
I don't suggest having too much of the tube sticking inside the firebox.  Here are some finished product pictures.

View media item 328513
View media item 328514
I'd be happy to answer any questions.  I'll post some more info later about the operation of the unit.
 
  • Like
Reactions: waywardswede
Dude...that is a great tutorial .well done.now we need to hear about how the cook time and temp control goes.increase in fuel burn time. ?
 
Dan, awesome tutorial. They make a 10 CFM fan unit, too, don't they? Do you think that would be big enough? How's it work maintaining the temperatures?
 
I take it the piece of plate steel inside the fire box around the inducer comes with the kit?
 
.....also what is the piece with all the notches and slots ( Iin your unpacking pic.)purpose?
 
The DigiQ maintained temp amazingly well.  Better than I have ever been able to do.  I usually start off with a full chimney of charcoal and a split log of hickory.  With the DigiQ I definetely used more wood than usual, but of course I had no temperature dips either.  The key is to let it do it's thing in the beginning and not micro manage it.  I did a test cook of a dozen loose pork ribs and it worked perfectly.  

They do make a 10 CFM model fan, but BBQ Guru thought it might not be enough, especially when the cooking chamber is full of food.  I rarely cook more than 2 racks of food at a time but went with the bigger fan anyway.  It goes on and off a lot so I wonder if the 10 CFM would have been fine, but it still maintained temp perfectly.

The square plate on the inside of the fire box door came with the kit.  That and the retaining ring on the outside keep the inducer tube attached.  It's not the most secure fit in the world because of where the inside piece hits the screw I used to secure the damper door.  It's no big deal if you're not rough with it.

The slotted flat piece is a stand for the control unit.  It can be bent and screwed to most any kind of setup you make for it.
 
.....all questions answered .can a rheostat be installed to slow it down? Probably a question for the manufacture.well.done.you covered all the bases.you have skills that would make the swede jealous. I just ran 3 racks of baby backs and everyone loved them but me.hickory...not good.apple / or / cherry way milder.....to much smoke for to long.overpowered ...my 2 cents.
 
Happy to be of service. No need for a rheostat. The DigiQ handles that. I smoke the ribs for 2.5-3 hours before either wrapping or using just charcoal and no more wood.
 
Last edited:
Can't remember what the initials stand for, but it's basically caulk.  The stuff used on smokers is high temperature and food rated.  Not everyone bothers with the food rated stuff, and to be honest once it cures and you've done a seasoning burn it probably doesn't matter.  If it's on the cooking chamber (CC) it should be 500° rated.  If it's on the side fire box (SFB) it supposed be 2000° rated.  Now, to be honest, I used some of the 500° stuff in my SFB and after almost a year of very hard use it's still there.  I don't really measure the temp in the SFB, but I get my CC above 350° on a regular basis (not always on purpose).
 
Davie,

Thanks for the lesson in BBQ Smoker abbreviations!  LOL

It does help.  The gasket I bought is rated up to 800 degrees so it sounds like I am good with the chamber.  I found the web site for BBQGASKETS and was going to contact them about suggestions.  I will pick up something with a higher rating for the SFB.

Thanks again for your patience.
 
SmokingMeatForums.com is reader supported and as an Amazon Associate, we may earn commissions from qualifying purchases.

Hot Threads

Clicky