New Brinkmann Trailmaster Vertical Smoker

  • Some of the links on this forum allow SMF, at no cost to you, to earn a small commission when you click through and make a purchase. Let me know if you have any questions about this.
SMF is reader-supported. When you buy through links on our site, we may earn an affiliate commission.

waywardswede

Meat Mopper
Original poster
Aug 5, 2013
252
21
Buffalo, NY
So, after looking around for a couple of months and reading through hundreds of threads here and other places I decided on a vertical trailmaster from Brinkmann.  I wanted to stay to a pretty slim budget, and seriously considered the small WSM, but I really wanted a stick burner.  I'm not going to be cooking for parties, it's just my family (and my wife is convinced that anytime I make anything in the smoker she'll need to eat out) so the small cooking footprint of this smoker is a benefit.

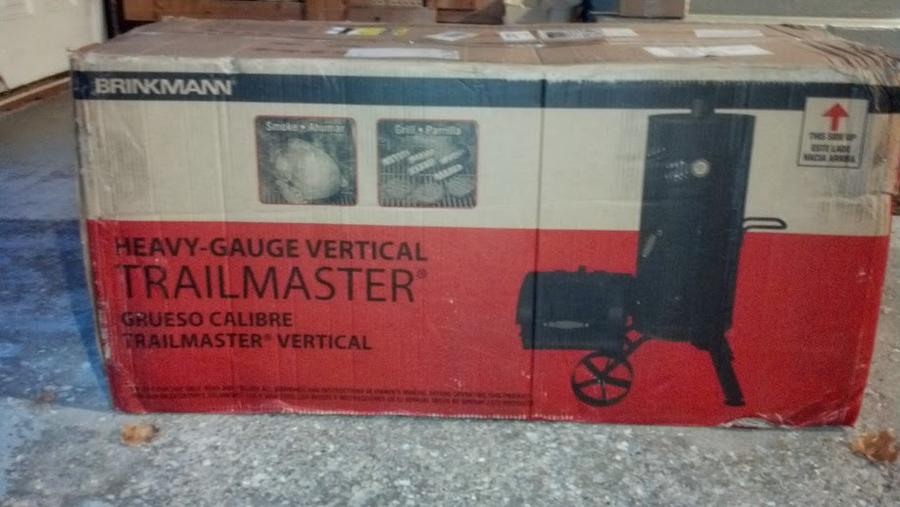
I told my wife that I wanted the smoker for my birthday, and even though she wants nothing to do with it this is what I found in the garage when I came home from work yesterday:


I'm psyched!  I pulled everything out to see just how bad it was going to be (some of the feedback on the Brinkmann trailmasters show that they can be a little sloppy) and I have to say it's not as bad as I expected.  A couple of minor dings and dents (some screws worked out in shipping and the packing leaves a lot to be desired) but no deal breakers and everything seems to fit together pretty well.

I've already sent emails to Justin at BBQ Gaskets (I can't leave a link but you can google it) and I'll be picking up one of their gasket kits and some door latches from them.  Great customer service there, BTW, they don't see many of the verticals but he is completely flexible, willing to help and has great advice.  I would definitely recommend them.

I'll be making an expanded steel burning bin for the firebox (already checked out the 3/4" expanded steel sheets at Home Depot), and I'm considering putting in an upper air inlet with a damper on the SFB for better air / smoke control, found these air controls on line


I'm not a welder, but I'm pretty handy and I'm sure I can get one of these in without too much trouble.  Any opinions from the crew here?

I'll be putting it together over the next couple of weeks, my weekends out going to be tied up for awhile so I won't get much time on it right away, but I'm planning on posting my progress as I get her together.  Stay tuned!
 
  • Like
Reactions: smokin sooner
I received the gasket and door clamp kit from BBQGaskets, and the air damper from BBQ Bonanza.  Tonight I was able to get the upper air damper installed on the fire box, I'm hoping it will give me better control of the air flow through the SFB.


It was pretty simple to install, just found the centerline of the the upper section of the FB then estimated the height I wanted it at, traced the openings with a pencil, drilled some pilot holes, cut it out with a metal blade in the jigsaw and smoothed the edges with the dremel.


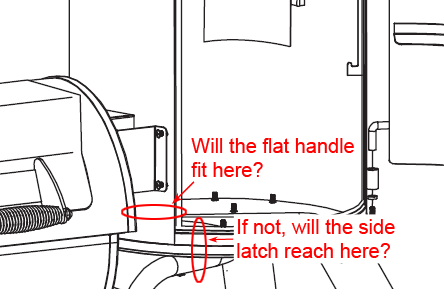
While I had the cooking chamber upside down I drilled out the screw holes for the bottom door clamp.  The flat clamp used on the horizontal Trailmaster won't fit on the bottom of the vertical, because the handle is too close to the firebox.  I sent this image to Justin to confirm the clearance problem, and we agreed that I should try the side latch for the bottom of the door:


I marked out the screw holes for the latch and drilled them out, but I didn't attach the latch yet, as I'll need to touch up the paint on the smoker.  I'll install the latch after I repaint.


That's it for tonight.  I'll be tied up tomorrow night, but hopefully I'll be able to get the fiberglass gaskets on the SFB halves and the crossover, and maybe get the SFB installed to the CC.  More updates then.
 
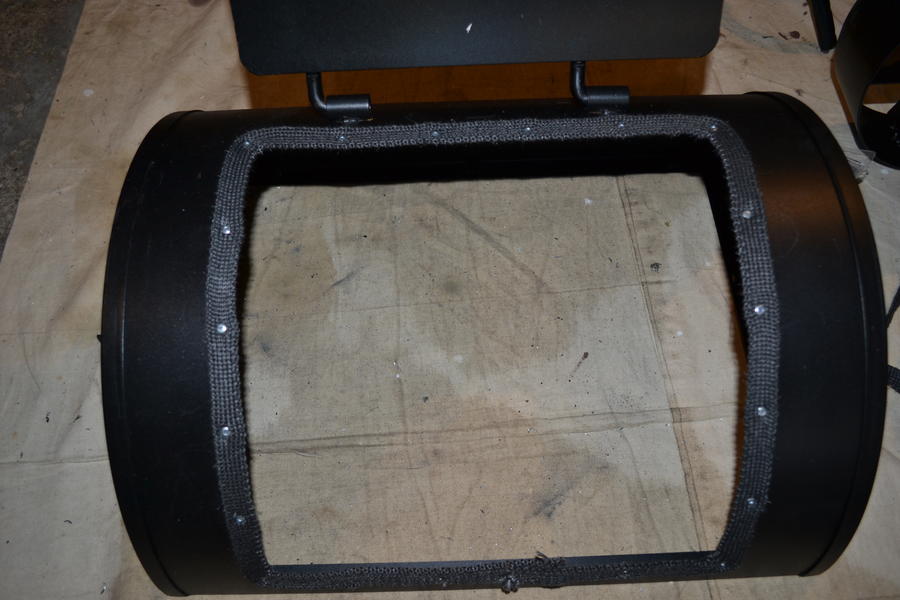
OK, I finished the mods to the SFB last weekend, I'm just now getting around to posting the pictures.  After getting the upper air vent put into the firebox I started with getting the gaskets on to seal it tight.  Again, with the help from Justin at BBQ Gaskets I ordered flat fiberglass gaskets (two 7' rolls) for the lid, the firebox crossover, and to install between the two halves of the firebox.  For the firebox lid Justin did not recommend either the red RTV (too hot there for that), or the black Rutland (will get brittle and flake off over time).  He said the best way to hold the gasket on there was to use rivets, so that's what I did.  I had purchased a box of small washers, as I was worried that the small heads of the rivets would push through the flat gasket, but when I tried them they actually held the head of the rivets high enough that the lid hit against them, defeating the purpose of the gasket.


Now I wanted to make sure that the crossover was sealed tight to the firebox, so I used the flat gasket there, too.  I used the red RTV to hold the gasket in place.  I know it's going to be too hot here for the RTV, but I only want it to hold the gasket on while I assemble it, so I hope it will be OK.


OK, next step is to assemble the firebox.  The first thing I noticed is that there are 6 screws holding the top and bottom halves together (3 each front and back), but nothing on the sides.  That is about 12" of flange without and support or clamping.  So I drilled a hole in the middle of each side through both flanges to put another nut and bolt for additional clamping.


However, before I can put the two halves together I have to work out the charcoal basket.  I wanted to do something different here, which worries me, because there are a lot of people here that are better than I am at this and I don't see where anyone else has done this.  But I wanted to be able to get as much burn time as possible in the FB, and the charcoal baskets that I've seen only take up the middle section of the FB.  I assume this is mainly because you want to be able to pull the basket out to refill and to clean out, but I'm wondering if that is really necessary.  I think it might be better to make the basket so that it takes up the entire area:


Now I know this is going to be more difficult to clean out, and that I lose some of the height, but I'm going to give it a shot anyway.  I'll just have to post an update down the road if it turns into an epic failure and I need to pull everything apart to remove it and start over.

Now that I have the basket set I can assemble the FB.  I use the red RTV here again, just to hold the flat gasket in place while I'm putting it together:


I didn't mention before, I thought I would have to cut the flat gasket at the corners, but when you cut the stuff it kind of unravels and flares up, like a nylon rope.  You can melt the end of the rope to get the strands to hold together, but that didn't work for this stuff.  As it turns out it's very easy to just make the turns, and it will lay flat even on the very tight radius that I had to work with.  It was actually very easy to work with.

OK, with the FB assembled it's time to attach to the CC.  It was a little tricky getting the bottom bracket that supports the FB to the leg assembly in place with my full size charcoal basket in the way, but the basket had enough play in it that I was able to move it around enough get my hand in there to back up the nuts.  I didn't get a good picture of that, but it wasn't that big of a deal.


You can also see where I used the red RTV where the crossover goes into the CC.  I'm worried about this, because I know that's going to be a very hot spot and I'm not sure if it will hold up.  In the image it looks like there is a lot of RTV there, but it was a pretty tight fit and there really isn't that much, I wiped almost all of it off of the inside with a paper towel.  Whatever is going to burn off should happen during the burn in period, and from there I'm thinking the grease and oils will fill in what little gap there is left.
 
OK, time to get the CC set.  For this Justin had recommended a self-adhesive flat gasket, it is part of the standard Brinkmann kit he has put together.  Just clean the area where it is going to be attached really well with alcohol, peel the back off and stick it on.  Can't get any easier than that.


This stuff would not bend around the curve, so it had to be cut.  But it didn't unravel like the fiberglass flat gasket, so it wasn't a problem.  There is an access panel on the back of the CC to refill the water pan, so I sealed that off, too.


View from the inside with the access panel door closed:


OK, almost done.  I need to make an opening for my temperature probes, so I picked up some rubber grommets at Home Depot and drilled a hole.  I'm not sure how this will hold up in the heat, but I'll be burning it really hot during the break in, if there's going to be a problem I should be able to see it there.  I'll deal with that if it happens.  I put the hole by the handle, I may have to come up with something to protect the sending unit from the weather later on.


OK, the last thing I want to change is the exhaust vent at the top of the unit.  I plan on using this year round, in the open, and I can envision a torrential downpour ruining my plans.  I'm not sure why they made it like this, seems to be very little thought about what happens if it rains.  You certainly can't just close the damper:


So I removed the damper and the screw, and bought a 4" aluminum vent cap at HD.  I also picked up a damper to put in the cap, and the whole assembly fit very nicely into the little smoke stack.  I just had to make a small cut in the cap pipe to fit around the screw brace and jammed the vent cap into the chimney with a little RTV.  We'll see if the wind can pull it out, but I don't think so, it was a nice tight fit.  I realize I didn't take a picture of that while I was doing it, but this is what it looks like completed.


I also didn't show drilling the holes for the top door clamp, or installing both the top flat clamp and the bottom side clamp.  You can see the top clamp here, and the bottom clamp, while quite a bit larger, looks basically the same.
 
Last edited:
I also realize now that I didn't take a full picture of the unit completed, so I'll have to do that over the weekend and post it.  I fired it up last Sunday for the burn in, and had no problem holding the 225 - 250 for a couple of hours, or getting it to the 400 for an hour that they recommended.  I wiped vegetable oil on the interior of the CC, and sprayed on some of the grilling Pam before firing it up.  After the break in I cooked a pound of bacon first, as I had seen that recommended somewhere here in the forum.  I then made some chicken wings late in the day (sorry, no pictures of those, it was the end of a long day) and they actually turned out pretty good.

I'm ready to start figuring out how to manage the TBS now, can't wait to start smoking!
 
Thanks, it seems like it sealed really tight.  I don't get any smoke coming out anywhere except the top vent, and it seems like I can get really good control of the fire temps.  I'll need some more experience with it before I really know what I'm doing.

I used just the rivets on the flat gasket, without the washer, placed one about every 2 1/2".  If I pulled hard on the gasket I could probably work it around the head of the rivet, as the fabric of the gasket isn't a really tight weave.  But when I tried using the washer under the head of the rivet it made it stick up high enough where the lid hit the head of the rivet, so there would have been an air gap between the lid and the gasket.  As the whole reason I was using the gasket was to get rid of any gaps that seemed self defeating.

I think it will be fine, it seems pretty secure and I shouldn't be disturbing it too much.  Time will tell.
 
Last edited:
Hey Swede, how did the mods turn out ? Just ordered me a Briinkman vertical, will be here tomorrow. Ordered the gasket kit from Justin also. Any pointers you can give me ?
 
So far it's working great. I put a couple of plates in the charcoal basket so that I can burn in an 'S' pattern, I'm thinking that will increase my burn time. I'll take a couple pictures this weekend so people can see what I did.

I smoked some cheese last weekend using the AMNPS, you'll want one of those for cold smoking, they work great.

Post a comment or PM me if you have any problems when you get started. I'm lovin' it, am having a blast.
 
I am new to the Forum which I stumbled upon looking for info about this smoker. I am very interested in it but saw a number of reviews and youtube videos saying things about door fitment. Did you have that issue? Also, could you post a list of everything you purchased with prices from BBQgaskets? Thanks!
 
Personally, I ordered mine from home depot and was disappointed in mine. It came with numerous dents and dings, I guess I should have sent it back. After assembly the cooking chamber door would not shut properly. The gasket set worked fine and they knew what to send me for that smoker. If I had to do it over I would not spend my money on this, I would look round for a little better vertical smoker.
 
 
I am new to the Forum which I stumbled upon looking for info about this smoker. I am very interested in it but saw a number of reviews and youtube videos saying things about door fitment. Did you have that issue? Also, could you post a list of everything you purchased with prices from BBQgaskets? Thanks!
Looks like I was one of the lucky ones, my doors fit pretty well.  I picked up the door latches from BBQgaskets, but the door seals pretty well without them.  Here's what I picked up from them, except I ordered another roll of flat fiberglass gasket for between the FB halves:

DescriptionUnit priceQtyAmount    
Flat mount toggle$6.001$6.00    
side mount toggle$8.001$8.00    
3/4" x 1/8" wool self stick.$15.001$15.00    
1/8" x 5/8" flat fiberglass for firebox$8.501$8.50    
one tube rtv red.$7.501$7.50    
Subtotal$45.00    
Total$45.00 USD
Personally, I ordered mine from home depot and was disappointed in mine. It came with numerous dents and dings, I guess I should have sent it back. After assembly the cooking chamber door would not shut properly. The gasket set worked fine and they knew what to send me for that smoker. If I had to do it over I would not spend my money on this, I would look round for a little better vertical smoker.
dj54, I'm sorry to hear that.  Have you been able to get it to work at all?
 
Oh yeah swede, smoked a stuffed pork loin saturday and it did pretty good. It was a little hard to control the temp but I figured that will come in time and more use. I guess I was expecting something like my oklahoma joe offset as far as quality and thickness of metal and was a little let down.
 
Thanks Swede! I have been trying to get an entry-level smoker and have been eyeing the Oklahoma Joe's smoker from Lowes but its almost twice what the Brinkman costs. I was also wondering if the Brinkman was built as sturdy as the Oklahoma Joes but I guess dj54 answered that question.
 
I've been looking at getting the Trailmaster Vertical Smoker, but been procrastinating because some of the issues that the reviewers have been having. It looks like you modified it to fix all of the problems that people were having. Thank you for taking the time to share all of this great information. 
 
Thanks for the great write up of your mods. My wife got me the vertical smoker for my birthday last month and I just got done putting it together last week.

I am really interested in the gaskets for the firebox and cooking chamber. I looked at the invoice you posted and I am trying to understand whether I need the kit with the latches or whether I can get by with just the gaskets.

Amazing work you did there.  Love it.
 
lionel, 

I have the gasket kit and latches, after a little while the gaskets kinda form to the lid and get kinda smaller, and they dont fit as tight, with the latches they keep it a good tight fit so i would reccomend getting the latches to get the most out of your smoker
 
Thanks, Smokering. I'll be ordering the kit this week.

Just as an aside, I cured the unit on New Year's Eve with some pecan wood, apple wood and bacon fat mixed with applewood BBQ sauce spread on some of the pecan wood. After letting it sit overnight, I can tell you it was a pleasure opening the door and smelling the smoker the next morning. Once I get the gaskets, I'll smoke a shoulder and maybe some ribs.
 
  • Like
Reactions: davidreynolds
if you talk to justin they have a kit made up specifically for this smoker but it doesn't come with enough of the rope gasket in order to seal the firebox door. i thought i would need it but i went ahead without it. the door is pretty heavy and i havn't had a problem with leaking out of the door, so its your decision weather or not you want to seal the firebox door
 
SmokingMeatForums.com is reader supported and as an Amazon Associate, we may earn commissions from qualifying purchases.

Latest posts

Hot Threads

Clicky