
MES PID Controller No drilling of rivets No high voltage wiring required.
The control board on top of my MES had failed a few times. I had enough so it is time for a PID.
My first question was which brand of PID. Looking at YouTube videos, the Inkbird ITC-100 series displays seemed brightest. The downside of this choice is that it operates in degrees Celsius. The wife and I decided we could work in Celsius. There are 4 models in the series, 2 are designed to drive an external SSR (Solid State Relay) as its output. Two have an internal mechanical relay for output. Each flavor of output has a high and a low voltage model available. Since I am controlling a relay inside the MES, I selected a mechanical relay output. If you are comfortable working with 120 volts, select the high voltage model ITC-100RH. If you are not comfortable with 120 volt, you will need a wall wart transformer more than 11.5 volts and less than 24.1 volts AC or DC will work- then you would select ITC-100RL .
To my way of thinking, PIDs are great at controlling temperatures but not easy to program. If you ask it to do something stupid, the PID will believe you and do its best to make your smoker be 900°C. The PID has an alarm circuit I could program and wire to turn off the heater if the alarm setting exceeded 149°C/300°F. I also wanted a buzzer to sound at the alarm temperature. Should it get over 300°inside the smoker, the alarm circuit turns off the heater and sounds the alarm.
PID program setting changes.
HIAL Upper alarm limit from 9999 to 0149
SC sensor Calibration From 0 to +5 - My probe read 95° C in boiling water after the change, it read 100°C.
MES Wiring
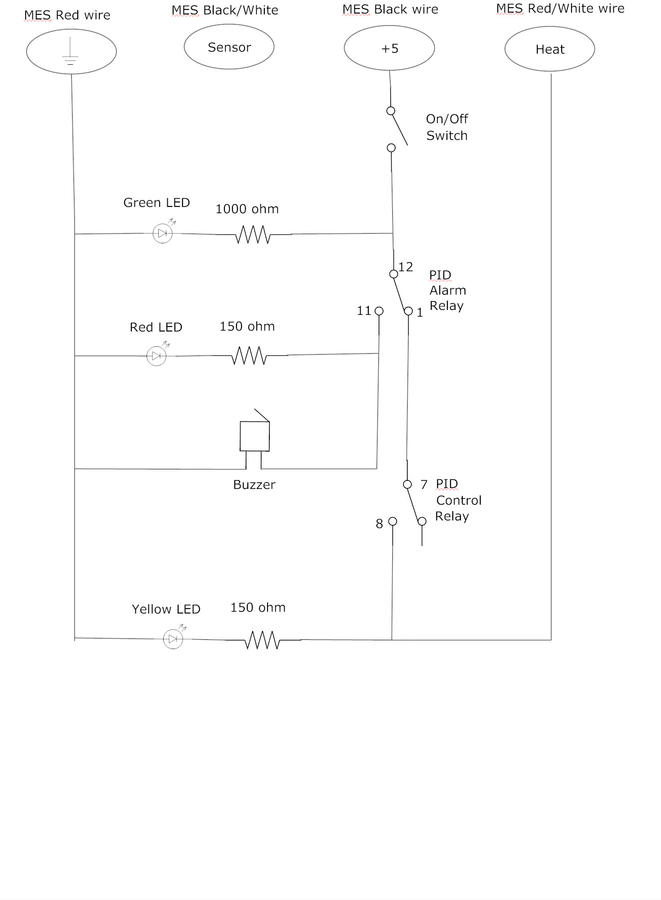
I found 4 wires going to the control board of the MES. I determined their functions as.
Black wire = +5 Volts DC
Red wire = Ground
Red/White wire = Heater control relay
Black/ White wire = Temperature sensor
The 4 wires from the MES are connected to a modular phone jack so the controller can be disconnected and stored in inside the smoker.
LED - I wanted bright LEDs that could be seen from inside the house on a sunny day. The red and amber LEDs were good at 20 mA but the green looked too bright at that current. It was better at 2 mA. So the green LED has a different value resister.
The buzzer is plenty loud at 5 volts DC.
I found a Martha Stewart stainless steel tissue box cover at the thrift store that makes a nice housing.
I chose a type K thermocouple with a long lead and made a bracket to hold the probe.
Concerned the braided steel thermocouple would touch something and make a short circuit, I wanted the probe to be grounded. I stripped ½ of a 2 foot copper wire and wrapped that foot of bare copper wire around the braid and then covered both braid and copper with heat shrink tubing.
When connecting the thermocouple, the Red lead must be connected to terminal #4 and the blue to #3.
I connected ground wire from the AC cord to the probe and the steel tissue box.
On the first run the PID will be in its learning mode. Put 2 bricks in the smoker. Do not be surprised if the PID over shoots the target let it cycle for at least 45 minutes. I have never seen an over temp reading after the first run.
Calibration
I put the tip of the probe in boiling water the display read 95. After changing the SC function to +5 the display now reads 100. You will have a different number.
The first time you run the PID you should enter the learning mode. To do this you should start with a cold smoker with 2 red brick inside to simulate the mass of the food you will be cooking. Set a temperature you will be normally cooking at and enter your learning mode. The name and how you enter this mode very with every make and model of PID. While learning the PID will over shoot the set point and cycle over and under the set point.
Operation
I have done a few smokes with the PID and have not seen an over shoot of more than two tenth of a degree C. Temperature control is very tight. I did not check away from the probe but it seemed to me the top shelf was warmer than the lower ones. I think a few degrees of temperature swing is a good thing with a MES. If the heater never gets to run more than a few seconds, the wood chips may never burn and you may not get any smoke. That is one reason I chose not to use a SSR as they can cycle on an off thousands of times in a minute.
Shopping list
PID $27.99
Thermocouple $3.84
LED Red $1.75
http://www.allelectronics.com/make-...3345592a403b2f4a37a59384e7ab28f02be1";i:1;N;}
LED Green $1.75
http://www.allelectronics.com/make-...3345592a403b2f4a37a59384e7ab28f02be1";i:1;N;}
LED Amber $1.75
http://www.allelectronics.com/make-...3345592a403b2f4a37a59384e7ab28f02be1";i:1;N;}
Resister 120 Ohm ¼ Watt $0.07
http://www.allelectronics.com/make-...3345592a403b2f4a37a59384e7ab28f02be1";i:1;N;}
Piezo Beeper $3.30
http://www.allelectronics.com/make-...3345592a403b2f4a37a59384e7ab28f02be1";i:1;N;}
Acronym's
MES= Masterbuilt Electric Smoker
PID= proportional-integral-derivative controller. https://en.wikipedia.org/wiki/PID_controller
SSR = Solid State Relay
Wall Wart= A small AC adaptor that hangs in the wall socket
Walta
The control board on top of my MES had failed a few times. I had enough so it is time for a PID.

My first question was which brand of PID. Looking at YouTube videos, the Inkbird ITC-100 series displays seemed brightest. The downside of this choice is that it operates in degrees Celsius. The wife and I decided we could work in Celsius. There are 4 models in the series, 2 are designed to drive an external SSR (Solid State Relay) as its output. Two have an internal mechanical relay for output. Each flavor of output has a high and a low voltage model available. Since I am controlling a relay inside the MES, I selected a mechanical relay output. If you are comfortable working with 120 volts, select the high voltage model ITC-100RH. If you are not comfortable with 120 volt, you will need a wall wart transformer more than 11.5 volts and less than 24.1 volts AC or DC will work- then you would select ITC-100RL .
To my way of thinking, PIDs are great at controlling temperatures but not easy to program. If you ask it to do something stupid, the PID will believe you and do its best to make your smoker be 900°C. The PID has an alarm circuit I could program and wire to turn off the heater if the alarm setting exceeded 149°C/300°F. I also wanted a buzzer to sound at the alarm temperature. Should it get over 300°inside the smoker, the alarm circuit turns off the heater and sounds the alarm.
PID program setting changes.
HIAL Upper alarm limit from 9999 to 0149
SC sensor Calibration From 0 to +5 - My probe read 95° C in boiling water after the change, it read 100°C.
MES Wiring
I found 4 wires going to the control board of the MES. I determined their functions as.
Black wire = +5 Volts DC
Red wire = Ground
Red/White wire = Heater control relay
Black/ White wire = Temperature sensor
The 4 wires from the MES are connected to a modular phone jack so the controller can be disconnected and stored in inside the smoker.
LED - I wanted bright LEDs that could be seen from inside the house on a sunny day. The red and amber LEDs were good at 20 mA but the green looked too bright at that current. It was better at 2 mA. So the green LED has a different value resister.
The buzzer is plenty loud at 5 volts DC.
I found a Martha Stewart stainless steel tissue box cover at the thrift store that makes a nice housing.

I chose a type K thermocouple with a long lead and made a bracket to hold the probe.
Concerned the braided steel thermocouple would touch something and make a short circuit, I wanted the probe to be grounded. I stripped ½ of a 2 foot copper wire and wrapped that foot of bare copper wire around the braid and then covered both braid and copper with heat shrink tubing.
When connecting the thermocouple, the Red lead must be connected to terminal #4 and the blue to #3.
I connected ground wire from the AC cord to the probe and the steel tissue box.
On the first run the PID will be in its learning mode. Put 2 bricks in the smoker. Do not be surprised if the PID over shoots the target let it cycle for at least 45 minutes. I have never seen an over temp reading after the first run.
Calibration
I put the tip of the probe in boiling water the display read 95. After changing the SC function to +5 the display now reads 100. You will have a different number.
The first time you run the PID you should enter the learning mode. To do this you should start with a cold smoker with 2 red brick inside to simulate the mass of the food you will be cooking. Set a temperature you will be normally cooking at and enter your learning mode. The name and how you enter this mode very with every make and model of PID. While learning the PID will over shoot the set point and cycle over and under the set point.
Operation
I have done a few smokes with the PID and have not seen an over shoot of more than two tenth of a degree C. Temperature control is very tight. I did not check away from the probe but it seemed to me the top shelf was warmer than the lower ones. I think a few degrees of temperature swing is a good thing with a MES. If the heater never gets to run more than a few seconds, the wood chips may never burn and you may not get any smoke. That is one reason I chose not to use a SSR as they can cycle on an off thousands of times in a minute.
Shopping list
PID $27.99
Thermocouple $3.84
LED Red $1.75
http://www.allelectronics.com/make-...3345592a403b2f4a37a59384e7ab28f02be1";i:1;N;}
LED Green $1.75
http://www.allelectronics.com/make-...3345592a403b2f4a37a59384e7ab28f02be1";i:1;N;}
LED Amber $1.75
http://www.allelectronics.com/make-...3345592a403b2f4a37a59384e7ab28f02be1";i:1;N;}
Resister 120 Ohm ¼ Watt $0.07
http://www.allelectronics.com/make-...3345592a403b2f4a37a59384e7ab28f02be1";i:1;N;}
Piezo Beeper $3.30
http://www.allelectronics.com/make-...3345592a403b2f4a37a59384e7ab28f02be1";i:1;N;}
Acronym's
MES= Masterbuilt Electric Smoker
PID= proportional-integral-derivative controller. https://en.wikipedia.org/wiki/PID_controller
SSR = Solid State Relay
Wall Wart= A small AC adaptor that hangs in the wall socket
Walta

