
After reading and seeing members add AMNPS to MES and using mailboxes I decided to do it too. First I ordered the AMNPS and my favorite wood types in pellets; hickory and alder. Then I looked for boxes and duct hardware. Most mailboxes I saw at my local Lowes were $15-$25. Stopped at Homedepot on the other side of town and there they were on clearance mail boxes for $7.97 - so I couldn't resist. Also picked up a 3 inch 90 degree adjustable aluminum elbow duct $3.50 and a straight duct that I did not use. I already had aluminum foil ducting tape.
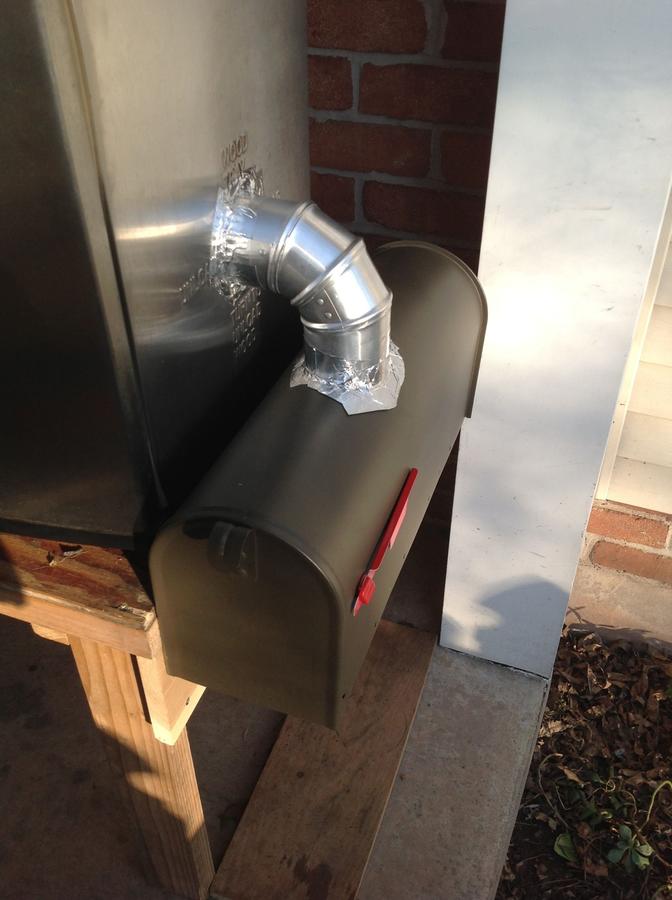
My MES was already on a homemade table/cart that I use to move it around - has two inline skate wheels. Decided the easiest and best place to mount the box was on the cart just below the chip loader. Attached a piece of scrap wood on the cart legs to provide a surface to screw the box to. Set the box just below the chip loading opening with enough room to use just the 3 inch elbow duct. Marked the top of box for cutting a 3 inch hole. Drilled two holes on the marks next to each other connecting them. Then used my scroll saw to cut out a 3 inch hole in the top of the box. Used a fine-toothed metal cutting blade. Broke the first well used blade. A new blade easily finished the cut. Used a metal file to smooth off the cut edges. The hole was well oversized but I didn't care because the foil tape would cover the gaps. Screwed the side of the box to the scrap piece of wood. Used washers to space the box away from mounting board to allow mailbox door to open and close.
Removed the chip loader hopper and inserted the elbow into the MES chip loading hole. The elbow only inserts an inch or so because it stops on the hopper retaining flange. The other end of elbow inserts into the top of the mailbox thru the rough oversized hole. Both ends were secured with aluminum foil ducting tape - used several 3 inch long strips overlapping them. Thought I may need to use screws or cut slots in the elbow ends to bend and fold to secure. But the tape worked way better than than I hoped. It has been on more than a week and tape is not as tight on the mailboxes pebble like finish as it is on the smooth MES side.
Here is the completed job:
Here is the whole MES with table/cart:
View media item 207607
The AMNPS fits right in:
I am considering lining the box with foil.
My MES was already on a homemade table/cart that I use to move it around - has two inline skate wheels. Decided the easiest and best place to mount the box was on the cart just below the chip loader. Attached a piece of scrap wood on the cart legs to provide a surface to screw the box to. Set the box just below the chip loading opening with enough room to use just the 3 inch elbow duct. Marked the top of box for cutting a 3 inch hole. Drilled two holes on the marks next to each other connecting them. Then used my scroll saw to cut out a 3 inch hole in the top of the box. Used a fine-toothed metal cutting blade. Broke the first well used blade. A new blade easily finished the cut. Used a metal file to smooth off the cut edges. The hole was well oversized but I didn't care because the foil tape would cover the gaps. Screwed the side of the box to the scrap piece of wood. Used washers to space the box away from mounting board to allow mailbox door to open and close.
Removed the chip loader hopper and inserted the elbow into the MES chip loading hole. The elbow only inserts an inch or so because it stops on the hopper retaining flange. The other end of elbow inserts into the top of the mailbox thru the rough oversized hole. Both ends were secured with aluminum foil ducting tape - used several 3 inch long strips overlapping them. Thought I may need to use screws or cut slots in the elbow ends to bend and fold to secure. But the tape worked way better than than I hoped. It has been on more than a week and tape is not as tight on the mailboxes pebble like finish as it is on the smooth MES side.
Here is the completed job:
Here is the whole MES with table/cart:
View media item 207607
The AMNPS fits right in:

I am considering lining the box with foil.
Last edited:


