That's right.
The way I am thinking about all of this is that the stirring/circulating of the air
within the smoker is independent of the air flow
through the smoker.
So, as TallBM points out in a later post, what we want (for circulating the air within the smoker) is a draft inducer type fan which stirs the air within the smoker itself, but which does not directly affect the flow of air
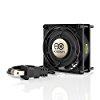
through the smoker. This is exactly the type of fan I've got and am considering installing into my MES 40.
The airflow through the smoker (the "draft", if you will) can then remain the same as it always was, being driven entirely by the convection (warm, lower-density air rising due to its buoyancy with respect to cooler, denser air). Or, a separate forced-draft system can be used to force air through the smoker if desired/needed.
I think it's best to think of these two air-flows as being separate, and separately controlled or adjusted.
Quote:
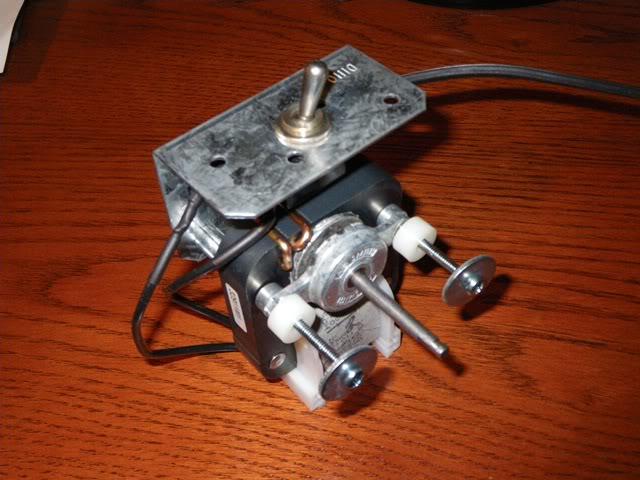
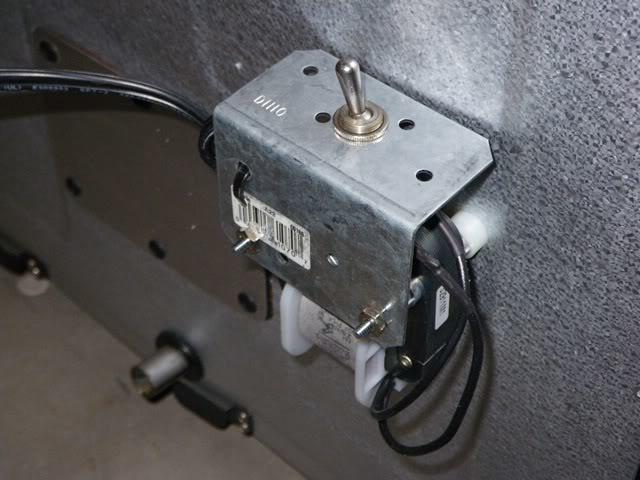
That fan is very much like the one I got to try in my smoker. I got a used fan meant for a convection oven.
(Darn how I hate that term: "Convection Oven")!
Convection is the effect where air circulates due to differences in density, usually due to temperature differences. As you heat air up, it wants to expand. If the pressure is kept the same, it "swells up" if you will. Naturally, when the air expands, its density goes down because the same number of molecules are now occupying more space. So any given volume has less molecules and therefore less mass. This is why a hot air balloon has lift or buoyancy.
Anyhow, it is this effect that causes convection.
But in a "convection oven", a fan is used to stir the air, NOT convection! So the terminology is completely backwards and counterproductive, creating more confusion among people, which is a real crime IMO. Whoever coined the term and applied it to a fan-forced oven should be ashamed of themselves.
Anyhow, I got a used fan from a "convection oven". They're designed for just the kind of use we're proposing here. The design uses a long shaft to separate the "hot end" (the fan and end of the shaft that is inside of the oven or smoker) from the "cool end" (the end where the bearings and motor are - outside of the oven or smoker).
There is also a separate, smaller set of fan blades back near the motor and bearings to help keep it even cooler and to draw heat that travels down the shaft out of the shaft before it enters the front set of bearings. This all helps allow such a fan to last a long time despite the main fan blades being inside of a very hot oven.
I need to drill a hole through both the inside and outside layers of the smoker body, and through the insulation between those layers. I want the hole to be small so that I don't create a puncture in the oven and an unwanted path for airflow into or out of the oven. But I also don't want the shaft to rub on the inside of the holes, so that's a tradeoff. It'll never be perfect. I also need to build an enclosure around the fan motor to protect it from the elements and to provide a grounded safety "cage" around the open electrical contacts on my fan's motor. But I do want the fan motor to be able to stay cool, so I may put some ventilation openings on the bottom of its enclosure, and make it out of aluminum for best heat transfer to the outside.
The power wiring for this fan will enter this safety/protection enclosure through a normal electrical box fitting or conduit gland bushing, etc. Electrical safety is a concern as is physical protection of the motor.
I'm still considering the best placement of the little stirring fan. I want it to blow air over the heating element of the smoker to some degree and stir the entire cabinet as well as possible. We'll never have the kind of fancy airflow control like what is mentioned in that article you linked to, but I'm hoping it can be made considerably better than what I have right now.
I'd also prefer to place some kind of protective screen over the fan blades inside of the smoker to prevent accidental contact with them either by food or my fingers! The placement of the little fan will need to be such that it doesn't interfere with the grates, etc., too.
I also think I may set up my control system to cycle the fan on and off rather than leaving it on 100% of the time. In my home "convection oven", the fan switches on and off. It may cycle on and off with power to a heating element that surrounds the fan, but in any case, it's not on all of the time. It cycles frequently enough, though, that it probably does keep the air well stirred.
It may be that running it 100% of the time is too much, drying things out or making things cook too rapidly. But in any case, having the ability to adjust (or have the controller adjust) the fan's duty cycle will let me play with that to get good stirring without having it be too much. I think there are good reasons for not directly controlling its speed, but instead cycling it on and off. And since that's easy enough to do, I plan on doing it that way. As that article points out, the hot air can be made to sweep the cold air out from around the "product" and then left there for its heat to soak in for a while, then stirred again, etc.
One of the advertising sites I see for a manufacturer of these commercial smokehouses uses a set of dampers operated by a motor drive, that constantly move to make the "breakpoint" they mention move from place to place within the smokehouse. They make the same point about sweeping the cool air away from the product, replacing it with the heated air, then letting the heat from that hot air soak into the product in that particular place while the smokehouse moves the breakpoint on to another place within the cooking chamber.
In our case, the chamber is small (like my home convection oven), so simply cycling the fan on and off probably stirs the air within the whole volume all at once, then, while the fan is off, you get that soaking-in phase. I sort of get the feeling that they want to periodically stir the air to displace the layer of cold air that builds up around the "product", and replace it with hot air, but then they let it rest that way for a short time, then repeat that process. Perhaps this gives less drying of the product yet achieves the even, faster cooking. So I do think this is something to consider.
My hope is to get even cooking and smoke throughout the whole chamber regardless of how I load the "product" in. Of course nothing is perfect, and I think it'll still be wise to arrange chunks of "product" in ways that lend themselves to good airflow around and between them to help keep things even. But having a fan stirring the mix every so often should be a LOT better than just letting the air sit stagnant in the smoker.
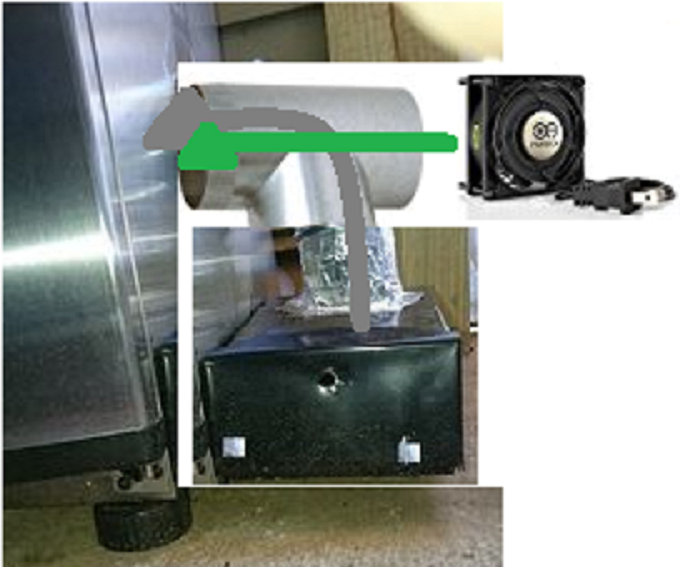
Of course, now we get to the other airflow. That's the air flowing through the smoker.
My feeling is that it will always be beneficial to be able to control that airflow separately from the stirring airflow. And we'll have that by using a stirring fan as you've shown in your pictures above.
I figure the actual "convection" or "draft" will still suffice to let us use our mailbox type smoke generators. The smoke generator won't even know if the stirring fan is on or off. It'll behave, and the draft will be the same as it always has been.
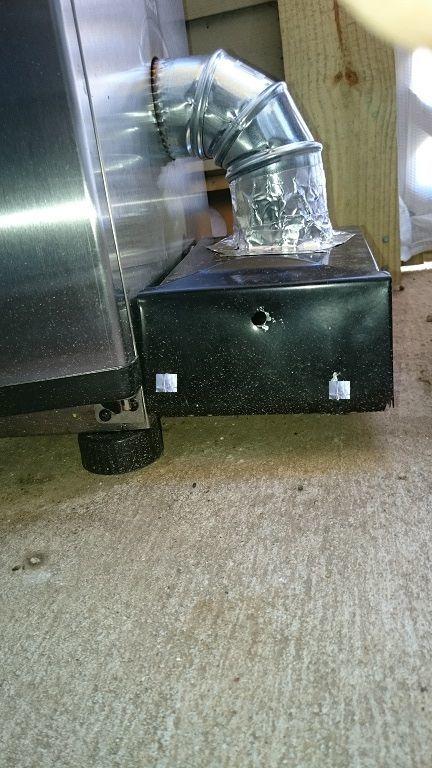
But I'm not currently using a mailbox mod. I just put an
AMNPS inside the smoker, and have the inside ducting/baffling set up to draw air over the
AMNPS by convection up and out of the vent at the top of the smoker.
I won't be able to do that once I have the stirring fan in place. At least not without some kind of modification. I think the best will be to move the
AMNPS outside of the smoker, into a mailbox mod setup, so that the airflow over the pellets will be independent of the air movement inside of the smoker. So that will all have to happen at the same time as my installation of the stirring fan.
I guess I could do something to shield the
AMNPS from the blowing of the stirring fan, and maybe continue to use it inside of the smoker. But there are other good reasons to move the smoke generator completely outside of the smoker, too, and I've been planning on doing a mailbox mod anyhow, so I'll likely go that route ultimately.
Now, we also get to the idea of using a fan to force or regulate the airflow through the smoker. And, perhaps a separate fan or way to regulate the combustion air over our burning wood chips or pellets, etc. you could end up with three fans if you wanted to control all three air flows separately!
But simply adjusting the position of the damper at the top vent of the smoker, and playing with the positions and sizes of the air inlet openings in a mailbox will still work just as it does in a non-stirred smoker. So actively controlling the draft and combustion air can be played with as separate projects.
I tend to think that having control over all of that would be handy, though. For doing jerky, for example, one might run the stirring fan constantly, and force more air through the smoker than normal to aid in drying it during the later phases of the process. Yet we'd want to keep the smoke density at some ideal level the whole time, so having independent control of all three air flows could come in handy there. Or for crisping the skin on a turkey or chicken, we might want to do the same kind of thing. On the other hand, for a lot of other smoking, we may not want so much air flow through the smoker so that things stay more moist, etc.
You could end up with a lot of control, but you'd then have to play with things to figure out what works the best. And we'd be on our own with all of that because none of the recipes you'd find would be tailored for that kind of setup.
But again, these smokers work pretty well right out of the box, or with some simple modifications. So playing with all of this is something I'd be doing, in great part, just because it's a fun part of the "hobby", not because it's necessary to get good smoked food. The last pulled pork and the last batch of smoked pecans that I did came out just great with things just as they already are. So I have to admit that this whole exercise would be mostly just smoker-nerdism!
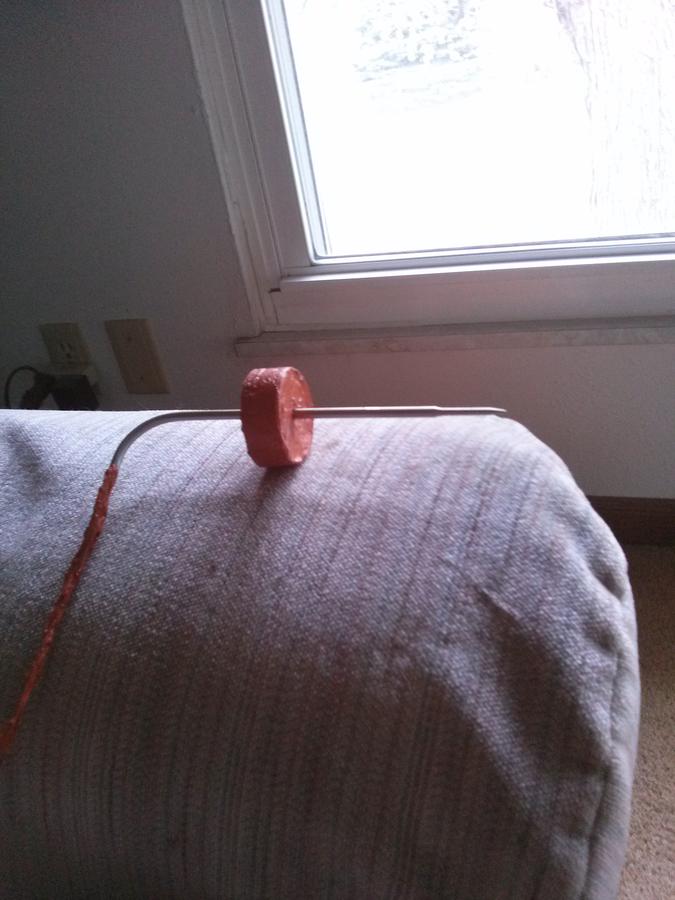
Excellent points, and I like the high-temp RTV pucks!
You really don't need a bunch of wires and probes interfering with the use of the smoker. That looks like an easy way to move things around when you need to, yet keep them in place.
The probes I bought to use for my proposed project came from Auberins.
I got all type K thermocouples because that's the kind of inputs I had available for my controller. I'll have to use type K thermocouple extension wire for them, though, which is an issue, but I have a bunch of that on hand now. But the point is that I found three different types of probes.
A meat probe, which is just like most meat probes with the probe tube bent over at a 90° angle and a sharp point on the end.
Air probes that have alligator clips already on them so I can move them around to monitor various points inside of the smoker.
A bulkhead-mount probe that I'll mount through the smoker wall to be the main sensor for the PID control of the smoker temperature.
As with the OEM setup, I'll likely put that sensor in a position above the heating element and not too far up from it so that it shows me a "worst case" highest temperature for fast response and greatest safety. I can log the temperature at the other two alligator clip probes and even work them into the control algorithm if I want, too. Being able to see how far the alligator clip probes are from the main sensor can be used to control the duty cycle of the circulating fan, too.
It should be interesting to see how uneven the temperatures are without the fan operating and then see how much that can be helped and how much fan operation is needed to achieve that.
When I did the last pork butt, I again placed the smoker's meat probe below the butt, hanging in paper clips from the rack about an inch below the butt. And I wrote down what that temperature read at various points in the run. I only inserted the probe into the meat after it had cooked for quite some time so I was sure the outside was pasteurized, and then, only after probing with a separate meat thermometer showed that the IT was getting high enough to warrant constant surveillance. So I do have the data for most of the run.
But I can only go by the smoker's own probe to know what the smoker's air temperature was supposed to be at all of those times. So I'd just have to assume that it was holding the set temperature. Which it may well have been. The butt came out great for whatever that's worth. ;)
Having some separate, independent probes that I can place as I wish should prove informative. It would be neat to make a run without the fan stirring, and then try to keep everything the same, but use the stirring fan, and see how a probe placed near the meat responds in both cases. But there are a lot of uncontrolled variables in such an experiment. Still, it'd be fun.
I'm waiting for good weather here to take on this project because I'll need to run cabling for the probes to where I plan to have the controller. And I'll need to take the smoker's back off and do some kludging for the fan and the probes as well as to bring out the power feed for the heating element so I can control it. And I'd like to do that all when I'll have good weather for it.
So for now, I'm just accumulating parts and pieces and trying to think of how to do it best.