
For many making bread is a daunting task. It is or can be time consuming and many recipes are complex and complicated. Here is an easy bread to make that isn't complicated and the directions aren't complex. If started in the morning you can have fresh bread for dinner.
Ingredients (this makes two loafs, you can half the recipe for one loaf).
8-12 quart tub, bowl for mixing
1000g Flour
780g water 90°f-95°f (32.22°c-35°c)
21g salt
4g dry active yeast

Ingredients (this makes two loafs, you can half the recipe for one loaf).
8-12 quart tub, bowl for mixing
1000g Flour
780g water 90°f-95°f (32.22°c-35°c)
21g salt
4g dry active yeast
- Combine the flour with the warm water in a 8 quart -12-quart round tub or similar-container. Mix by hand until just incorporated. Cover with plastic wrap and let rest for 20 to 30 minutes.
- Combine Salt and Yeast in a small bowl. Sprinkle evenly over the top of the flour and water dough (from the first step) and mix by hand, wetting your working hand before turning so the dough doesn't stick to you (it's fine to rewet your hand three or four times before you mix). Reach underneath dough and grab about one-quarter of it. Gently stretch this section of dough and fold it over the top to the other side of the dough. Repeat three more times with the remaining dough, until the salt and yeast are fully enclosed.
- Once all of the dough has been folded over itself, create a pincer like grip with your thumb and forefinger and squeeze big chunks of dough, tightening your grip to cut through the dough. Make five or six cuts across the entire mass of dough, before folding the dough over itself again a few more times. Repeat, alternately cutting and folding until all of the ingredients are fully integrated and the dough has some tension in it. Let the dough rest for a few minutes, then fold for another 30 seconds or until the dough tightens up. The target dough temperature at the end of this mix is 77 (F) to 78 (F). Cover the tub with plastic wrap and let the dough rise.
- After an hour and a half, you need to "fold" the dough a few times. To fold the dough, reach underneath the dough and grab about one-quarter of it (similar to what you did in the second step of this recipe ). Gently stretch this section of dough and fold it over the top to the other side of the dough. Repeat four or five times, working around the dough until it has tightened into a ball. Grab the entire ball and invert it so the seam side (the side where all the folds have come together) faces down on the bowl. Once the dough relaxes a bit and flattens to the bottom of the tub, repeat the process. After each fold, the dough develops more structure and will take longer than before to completely relax. Repeat one more time for a total of 3 folds.
- After the last fold, cover the dough with plastic wrap and let it rise overnight at room temperature. After 12 to 14 hours, it's ready to be divided.
- When the dough has risen overnight (or 6 hours minimum rise), prepare a workspace about 2 feet wide by sprinkling a moderate amount of flour over the surface. Flour your hands and sprinkle a bit of flour around the edges of the tub filled with dough. Tip the tub slightly and gently work your floured hand beneath the dough to loosen it from the bottom of the tub. Gently ease the dough onto your workspace without pulling or tearing it.
- With floured hands, pick up the dough and ease it back down onto the work surface in a somewhat even shape. Dust the area in the middle with flour, and use a dough scraper to divide the dough into 2-equal sized pieces.
- Dust 2 proofing baskets with flour and shape each piece of dough into a medium tight ball by using the same method you used to fold the dough: that is, stretch and fold one-quarter of the dough up to the opposite side of the dough, only pulling each segment to its maximum stretch. Repeat, working your ay around the dough until it forms into a ball. Place each seam side down in its proofing basket and cover with a flour sack (if you don't have a proofing basket, simply shape the dough into balls and cover with a flour sack). Let the loaves proof at room temperature for about an hour and a half, or until the loaves are fully proofed. To test that the dough has been fully proofed, poke each loaf with a flour finger, making an indentation about a 1/2-inch deep. If it springs back immediately, the loaf needs more proofing. If the indentation springs back slowly and incompletely, the loaf is fully proofed and ready to bake. The warmer your kitchen is, the faster the loaves will proof.
- As the loaves are proofing, put 2 Dutch ovens with their lids (leave lids off to speed up heating) on in the middle rack of the oven and preheat to 475 (F). If you only have 1 Dutch oven, put the second loaf in the fridge for about 20 minutes before baking and bake the loaf after you've finished baking the first one.
- When the loaves have finished proofing, use two oven mitts to remove the preheated Dutch ovens from the oven. Carefully place the loaves in the hot Dutch oven, with the seam side (that is, the top of the loaf will be the side that was facing down while it was rising) up. Use oven mitts to cover the Dutch oven with its lid, and place the covered Dutch oven in the oven.
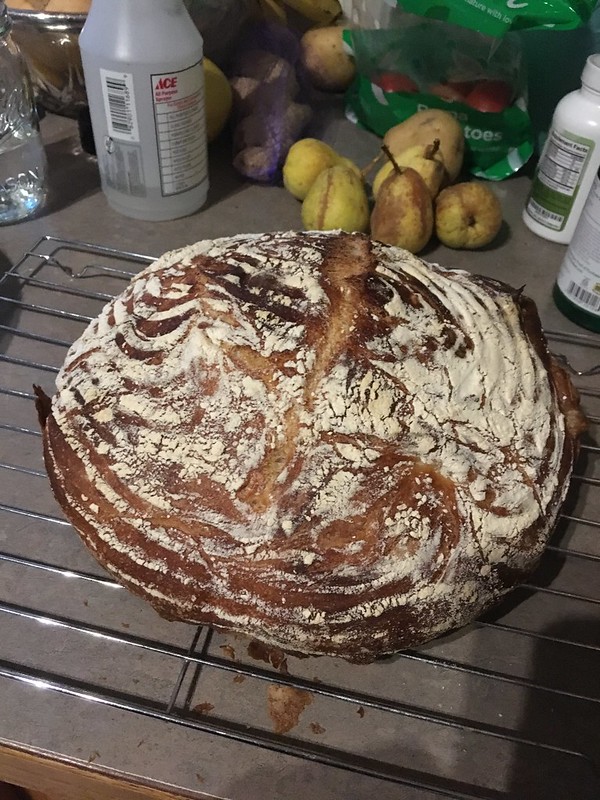
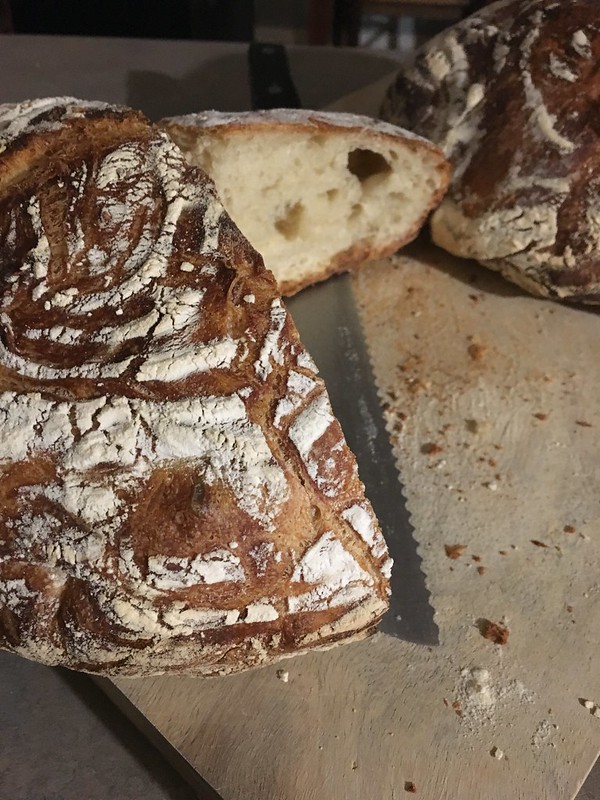
- Bake for 20 minutes, then carefully remove the lid and bake for another 20 to 25 minutes, until medium dark brown all over the loaf. Once the loaves are dark brown, remove the Dutch oven and carefully tilt to turn the loaf out. Let cool on a cooling rack and allow it to rest for 20 minutes before slicing.
Last edited:
