
- May 25, 2015
- 28
- 15
I'll start by saying I'm not a welder, and I don't even play one on TV. I'm a firm believer in function before form and tend to be a "design/build it as you go" kind of guy.

After doing some reading on the site, I decided the best bet for me was to get a Brinkmann TMLE and try to make it a reverse flow. So far, so good.
I picked up a piece of 8" x 18" 26 gauge sheet metal (plain steel, not galvanized) to use as a deflector and direct heat from the SFB to under the baffle plate. It's held in place with a couple of sheet metal screws through the side of the CC. It comes down at a 45 degree angle and has a flange bent on each end. One to sit flush against the end wall of the CC, and the other to sit flush against the bottom of the baffle plate.
I had a 3/16" baffle plate cut at a local shop. It measures 16" x 32", and just fits between the CC grate rails. The 32" length sits up nice against the deflector and still leaves about 4.5" between the baffle plate and the end wall for smoke to travel. The baffle plate sits on the walls of the cooking chamber (walls, not the charcoal grille rails) and makes a nice seal. It also leaves about 4" from the baffle plate to the cooking grates.
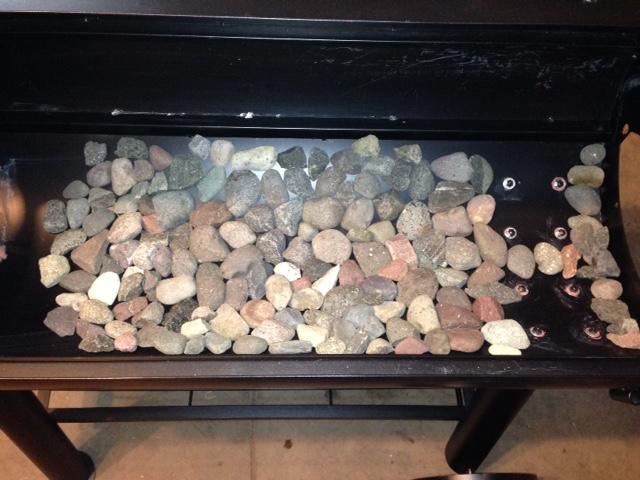
I was happy to see the Brinkmann was a little heavier construction than the entry level off-set smokers. However, I thought it was still a little on the thin side, and I worried about losing too much heat through the bottom running it as a reverse flow. I decided to put in some mass to help hold some heat, but needed to make sure I didn't restrict air flow too much (clearance from bottom of baffle plate to bottom of the cooking chamber is about 5" at the center bottom of the CC. So, I used some <1.5" gravel that I had in the side yard (similar to sauna rocks only smaller). I put them in a single layer from the bottom up the sides to hold the shape of the CC. Seems to have worked perfectly. Had it at 250 degrees on the Brinkmann gauge during seasoning today, and I could put my hand on the bottom of the CC for a short time.
Rocks in bottom
Deflector plate in place
Opening from SFB to CC
Baffle plate sitting on deflector flange and Baffle plate clearance from end wall
Baffle Plate to Grate Clearance
To make it a reverse flow, I had to move the smoke stack to the opposite end. I couldn't put it in the opposite end wall because the SFB door wouldn't open. So, I had to go off the back of the CC and make something up. Again, no skill here when it comes to welding, so I elected to use some furnace air duct and make something work.
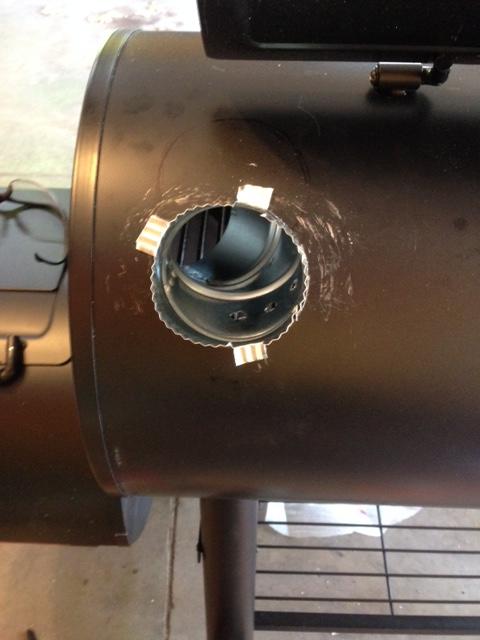
I cut a hole in the back with a jig saw. In hind sight, I should have bought a 4" hole saw because the base of the jig saw beat up the CC surface somewhat, and my hole didn't come out perfectly round. But, close enough for this guy, and nothing a little high temp caulk couldn't fix.
I started with an adjustable 4" elbow with three "tabs" cut that I could fold over once through to hold it in place (one of them is screwed to the CC wall).
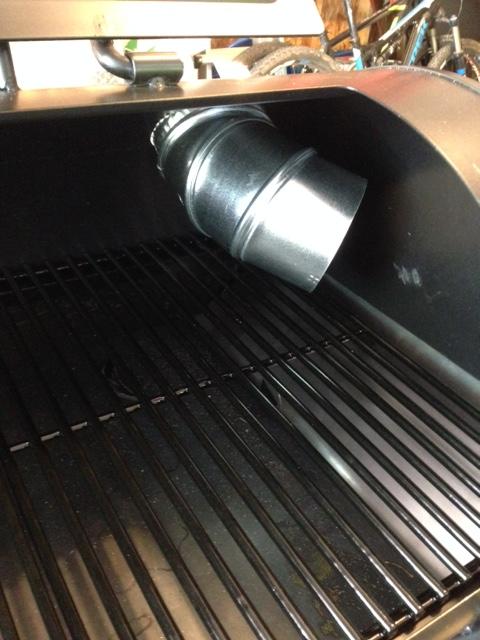
Then, I used a second adjustable elbow and attached it to the elbow coming through the CC wall with screws. I put a 24" piece of 4" duct on top of that for my vertical, and than caulked around the stack where it came through the CC wall.
This gives a good chimney and allows me to adjust the smoke pick up height in the CC. The bottom of it is currently 2-3" off the grates.
Last, but not least...
I made a charcoal basket out of two pieces of 12" x 24" expanded metal. It seems to have worked well, but I was surprised how much ash stayed in the basket during seasoning. Thinking I should have used 3/4" expanded metal instead of 1/2". Will see how it goes during the first smoke. Concerned with airflow once it fills with ash.
Last few things I need to do is get a couple therms for grate level temps, make a rack to stack in more ribs, and get some aluminum pans for drippings.
Itching to try some ribs, but prior commitments will delay that till next weekend. More to come...
After doing some reading on the site, I decided the best bet for me was to get a Brinkmann TMLE and try to make it a reverse flow. So far, so good.
I picked up a piece of 8" x 18" 26 gauge sheet metal (plain steel, not galvanized) to use as a deflector and direct heat from the SFB to under the baffle plate. It's held in place with a couple of sheet metal screws through the side of the CC. It comes down at a 45 degree angle and has a flange bent on each end. One to sit flush against the end wall of the CC, and the other to sit flush against the bottom of the baffle plate.
I had a 3/16" baffle plate cut at a local shop. It measures 16" x 32", and just fits between the CC grate rails. The 32" length sits up nice against the deflector and still leaves about 4.5" between the baffle plate and the end wall for smoke to travel. The baffle plate sits on the walls of the cooking chamber (walls, not the charcoal grille rails) and makes a nice seal. It also leaves about 4" from the baffle plate to the cooking grates.
I was happy to see the Brinkmann was a little heavier construction than the entry level off-set smokers. However, I thought it was still a little on the thin side, and I worried about losing too much heat through the bottom running it as a reverse flow. I decided to put in some mass to help hold some heat, but needed to make sure I didn't restrict air flow too much (clearance from bottom of baffle plate to bottom of the cooking chamber is about 5" at the center bottom of the CC. So, I used some <1.5" gravel that I had in the side yard (similar to sauna rocks only smaller). I put them in a single layer from the bottom up the sides to hold the shape of the CC. Seems to have worked perfectly. Had it at 250 degrees on the Brinkmann gauge during seasoning today, and I could put my hand on the bottom of the CC for a short time.
Rocks in bottom
Deflector plate in place

Opening from SFB to CC

Baffle plate sitting on deflector flange and Baffle plate clearance from end wall


Baffle Plate to Grate Clearance

To make it a reverse flow, I had to move the smoke stack to the opposite end. I couldn't put it in the opposite end wall because the SFB door wouldn't open. So, I had to go off the back of the CC and make something up. Again, no skill here when it comes to welding, so I elected to use some furnace air duct and make something work.
I cut a hole in the back with a jig saw. In hind sight, I should have bought a 4" hole saw because the base of the jig saw beat up the CC surface somewhat, and my hole didn't come out perfectly round. But, close enough for this guy, and nothing a little high temp caulk couldn't fix.
I started with an adjustable 4" elbow with three "tabs" cut that I could fold over once through to hold it in place (one of them is screwed to the CC wall).
Then, I used a second adjustable elbow and attached it to the elbow coming through the CC wall with screws. I put a 24" piece of 4" duct on top of that for my vertical, and than caulked around the stack where it came through the CC wall.

This gives a good chimney and allows me to adjust the smoke pick up height in the CC. The bottom of it is currently 2-3" off the grates.

Last, but not least...
I made a charcoal basket out of two pieces of 12" x 24" expanded metal. It seems to have worked well, but I was surprised how much ash stayed in the basket during seasoning. Thinking I should have used 3/4" expanded metal instead of 1/2". Will see how it goes during the first smoke. Concerned with airflow once it fills with ash.

Last few things I need to do is get a couple therms for grate level temps, make a rack to stack in more ribs, and get some aluminum pans for drippings.
Itching to try some ribs, but prior commitments will delay that till next weekend. More to come...


